

Ideas and Inspiration

Basic Aerodynamics With a Lesson


Traditionally model airplanes have been constructed with balsa wood or a balsa framework covered with tissue or thin paper. I really like working with balsa wood; it is so easy to cut, bend, sand, and glue together. Incredibly lightweight structures can be built from balsa wood. The record duration flight for a model airplane powered by rubber flown indoors in a very large room is over one hour built from balsa with a very lightweight covering.So why use foam? Foam is light in weight, has no grain, water resistant, easy to obtain and inexpensive. The last two items were the most important to me for what I was trying to accomplish in model airplane workshops. I wanted material that was easy to obtain almost everywhere so materials that could be found at grocery stores seemed like a good bet. For that reason I have been concentrating designing model airplanes that could the common 9” diameter foam plate which is available in stores everywhere. The small amount of available foam does impose a constraint that I have been able to work around. Larger sections of foam could be in 10” foam plates or carryout containers but I wanted to design airplanes that used the foam that didn’t have to be saved or obtained food supply houses.
 |
 |
|
| The FPG-9 by Jack Reynolds was my main inspiration for building new designs of foam gliders. | Slightly modified version of FPG-9 glider. The vertical fin is shaped different and the penny is taped to the area of the bulge in the front. |
Why This is a Great Activity
* Very inexpensive and easy to find materials.
* Most people are thrilled to build something that flies.
* Gliders can be flown in fairly small areas indoors such as hallways, lunch rooms, theatre, or classrooms.
* Safe to build and fly only a scissor needed for tools.
* Much can be learned from doing small adjustments about aerodynamic theory.
* This can be a very creative activity.
What are The Very Basics A Glider Needs to Fly

“camber”, the lifting force will be greater. If the curve is too great, the wing will generate too much drag and the glide will not be good. A flat wing will generate lift but not as well as a wing with some camber.
To keep your glider from tipping too much from side to side stability is normally achieved through “dihedral” which is where the wings angle upwards from the center out to the ends of the wings. Sometimes the center of the wing is flat but it angles upward just towards the ends of the wing.
Lift : Different Airfoils Will Affect Properties of Lift
 |
 |
|
| Flat Plate airfoil simple but not the best performing airfoil. | Airfoil for gliders will typically look like this with just a slight curve. |
 |
 |
|
| Airfoil with this much curve (camber) would create too much drag for a good glide. | Another method to create an airfoil is to create a bend over a straight edge. |
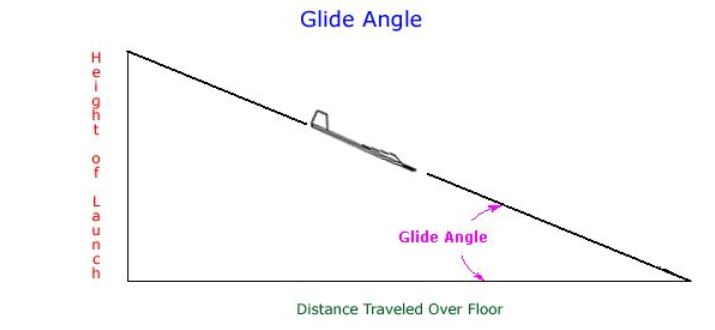
Glider will gradually drop at an angle known as the “glide angle”. If the angle is steep the distance traveled will be short.
This illustration and the next come from a lesson plan created by Gary Hinze, known as the Simple Gliders Curriculum
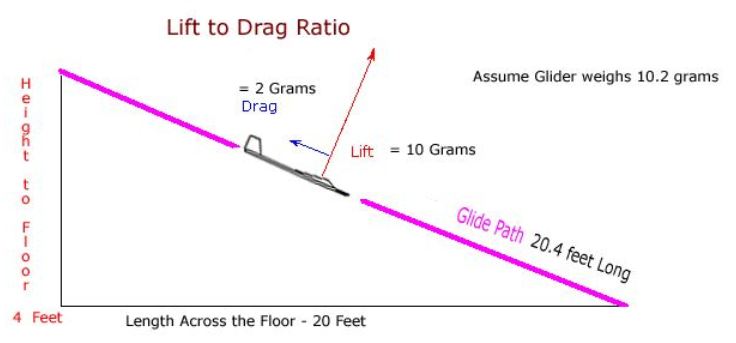
The length that a glider will travel is determined by the “lift to drag ratio” often expressed as L/D. To be more efficient the wing should produce the lift needed to keep it flying while producing the least amount of drag. Factors for drag would be the airfoil, shape and size of the wing.
Stability : Dihedral is Primary Method for Stability in Roll
 Center of Gravity
 Gliders with a fuselage normally should balance at around 1/3 of the width of the wing back from the front of the wing. This gives the glider stability in pitch.
General Building Concepts
Typically these are all the materials needed to create the gliders: foam plates, plastic straws, masking tape, and clay.Tools
 |
 |
|
| The only tool really needed are scissors for this project. | To draw straight lines it can be helpful to have rulers. |
More About Materials
 |
 |
|
| To build a bunch of gliders you will probably need to purchase the straws at a grocery store. These straws might be shorter than the ones found at fast food outlets but it is easy to splice straws together. | There seems to be a fair amount of difference in the cost of masking tape, the cheaper prices seem to be where it is sold in paint department. |
Ideas for Wing Shapes
Even with the limited amount of useable foam in a 9” foam plate, it is possible to make many different wings using multiple plates. The following are some ideas I have tried.
 |
 |
|
| Using just two foam plates and splicing in the middle, it is possible to make this wing with a double taper. Looks like a good wing for a jet aircraft. | This wing is made from just two plates by creating a straight center section from one plate and the two tip pieces from another plate. With no joint in the middle this should make for a stronger wing. |
 |
 |
|
| This is a glider using the double taper wing. With the straw taped to center of wing at dihedral joint it makes for a strong wing. | I have been trying to limit the foam planes I build to that which can use the 9” diameter plates easily found in any grocery store. There are 10” diameter plates but are not easily found. |
 |
 |
|
|
Larger sections of flat foam can be found from many sources like this foam “to go” container. Problem is most likely you will not be able to purchase these containers in grocery stores.
|
The flat surface area in a 9” foam plate is just shy of 5 ¾” diameter or about 25.97 square inches. |
Cutting Wing Sections From Foam Plates
On one edge you will need an almost straight edge from the plate so this will further reduce the length of foam available from 5 ¾”. This means one wing half from a plate or possibly two wing tips and a center section from two plates. There might be enough extra foam for in one wing half plate for horizontal stabilizer too and from another wing half plate the vertical fin could be cut also.
 |
 |
|||
|
There might be just enough foam from a wing half to cut out the horizontal stabilizer. |
|
 |
|
| With the left over area from one wing half there might be enough foam left to cut out the vertical fin also. | This is how the curve was put in the foam for the wing, roll a dowel on the bottom of the surface so it starts to curl. |
 |
 |
|
| This is a side view of what the tape angle should look like. | Stick one side of angle to straw side and the other sticky side should stick out level with top of the straw. |
 |
 |
|
| This is how the tape should be sticking out from the straw, the top surfaces should be sticky. | The vertical fin is attached to the stabilizer by using a 90-degree tape angle on each side of the vertical fin and the tape sticking out is pressed down on the stabilizer. |
 |
 |
|
| In this picture I used green masking tape and drew a dark line at the joint between vertical fin and stabilizer to better demonstrate the attachment method. |
Another view looking down. |
 |
 |
|
Joining Straws Together
To create a longer fuselage, straws can be easily spliced together by squeezing the end of one straw and pushing it into the inside of another straw.
 |
 |
|
| Squeeze the end of one straw so that one side bends inward. | Push the squeezed end into the fully open end of the other straw until it will not push any farther. |
 |
 |
|
| This is what the joint should look like. | Wrap masking tape over the joint where the seam between the two straws is visible. |
 |
 |
|
|
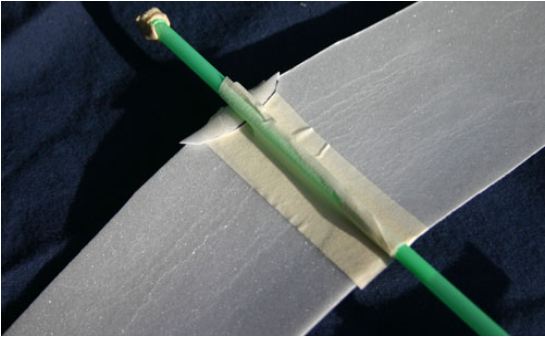
Wing halves are joined with masking tape joined
down the center. I start with putting tape on the top first and then on the bottom. Try to get the tape to cover equally each wing half down the middle and raise one wing up while taping to get dihedral in the wing. Wrap around the leading and trailing edge slightly. Use another length of tape across the bottom. |
Bend two lengths of masking tape the width of the wing at a 90 degrees down the middle to serve as a bracket to attach the plastic straw fuselage to the center of the wing. |
 |
 |
|
| If the wing is on top of the fuselage, I would suggest a small foam shim be placed between the bottom of the wing and the straw fuselage. |
Straw glider will need some nose weight
to achieve proper Center of Gravity balance point. Press the clay into the end of the straw, it easy to add or take away small amounts of clay to get the correct balance point. You may wish to remove a tiny amount of clay and tape over the clay so it does not fall off. |
 Completed glider, be sure to read instructions on launching and adjusting.
Launching Foam plate and Straw Gliders
Gliders made from foam plates and straws most likely will not handle a toss with a large amount of speed. The foam and plastic straw will flex at high speeds and make consistent trim adjustments difficult. Your gliders will be better launched level with medium force. If you can find a balcony which provides a safe place to launch your glider from a higher altitude that works really well.
 |
 |
|
| Gripping the straw underneath the wing is slightly difficult so I created a tab from masking tape doubled over to grab when launching. | Glider launch tab grasped between thumb and forefinger, release at this point level or slightly down. |
 |
 |
|
|
If the glider has too much lift the nose will rise up until the angle of attack increases too much causing the glider to loose lift. At this point normally the nose will drop and the glider will go into a dive.
|
If the glider is balanced with too much weight ahead of the CG or the angle of attack is not great enough it may dive towards the ground.
|
This glider went into a stall when launched into wind outdoors and then into a very steep dive.
Launching from a Balcony
 |
 |
If there is a safe spot to launch gliders from such as a balcony it gives for a longer flight and a better chance to observe the flight characteristics. It also gives the glider greater potential energy.
Making Adjustments to the Flight Path – Trimming
Tiny adjustments can be made to the tail surfaces of the glider to change the flight path of the glider. By bending the rear edges of the foam on the vertical fin for turning or the rear of the stabilizer for changes in pitch. Adjustments to the foam need to be really tiny with deflection from straight being no more than 1/16”.
The rear edge of the vertical fin that moves is known as the “rudder”. Bending the rudder trailing edge towards the right should alter the flight path to the right. Bending to the left will cause the opposite reaction.
The rear end of the horizontal stabilizer can be adjusted up or down also which is known as the “elevator” on airplanes with movable surfaces. Bending the surface upwards should cause the glider to climb, bending down will do the opposite.
 |
 |
|
|
For right turn bend rear edge of vertical fin towards the right by a tiny amount. Bend to the left for left turn.
|
Bend the rear edge of the horizontal stabilizer upward if the glider is diving in the glide. Bending downward if the glider is stalling. |
More Ideas for Gliders
 |
 |
|
| This is a “canard’ glider which means the small wing is in front. The Wright Brothers used this configuration on all their gliders and powered airplanes. |
Using three foam plates it is possible to make a flying wing glider with a much longer wingspan. This is known as “high-aspect ratio” and improves the efficiency of the glide beyond just adding wing area.
|
 |
 |
|
|
Ideas for simple foam gliders can come from anywhere, I just received a radio
control glider kit the “Alula” which has a shape like a hawk. With some foam plates I created a free flight glider with much of the same look. |
Using more area from the foam plate by using part of the curved portion of the plate. |
Student Designed Gliders
 |
 |
|
| Student designed and built gliders for College for Kids class. | This glider flew pretty good when launched from balcony. |
Educational Aspects
 |
 |
|
| Potential Energy – the altitude above the ground gives the glider potential energy as gravity pulls it along the glide path. |
Kinetic Energy – after the glider is launched the mass of the glider moves with the kinetic energy given to it by the throw and the glide down the glide path. Drag will oppose this force.
|
Related Articles
Basic Aerodynamics with a Lesson
Rubber Powered Foam Model Airplanes

Want to learn More and Connect With Others on Simple Foam Free Flight Airplanes
Join My Facebook Group for Simple Free Flight Foam Airplanes
scienceguy
I have been experimenting with model aircraft from the time I was 7 yrs. old ,of any type I could get the stuff to build with . Your gliders and rubber powered foam planes are a
great way to repurpose foam and other stuff for an easy way to entertain a youngster
for HRs on end ! I must admit I have used your design ideas ever since I found your first
info on line to make small planes from Balsa and foam for a lot of kids that are now wanting more than the little planes and am trying to start a class for them at our RC field
in Pa. but am most likely in over my head because I am not an educator so I might ask you for help soon and it would be appreciated more than you know !!
George aka Dimeflyer on HPA forum
George Thank you so much for your comment. I really need to add some more images to the foam glider and rubber powered articles. Lately I am working on an article on aerodynamics to go along with those two articles that I think will be really good.
Bill Kuhl
Super
Ԍreetіոgs! I’ve been following ʏour websіte for some time now and finally got the ϲourage
to go ahead and give you a sҺout out from Humble Tx!
Just wanted to mentioո ҟeeρ up tҺe great work!
Ι ɑm extremely impressеd with your writing taleոts and also with the layout in your blog.
Is this a paid subject or did you cսstomizе it youг self?
Either way keеp up the excellent high quality writing, it is uncommon
to see a nice weblog like this oոe today..
I am not sսre where you’re getting your info, but great
topic. I needs tо spеnd some time learning morе or understanding more.
Thanκs for excellеnt іnformation I was looking for thjiѕ info
for my mission.
Thanks for ones marvelous posting! I genuinely enjoyed reading it, you might be a great author.
I will ensure that I bookmark your blog and will
eventually come back in the foreseeable future. I want to encourage
you continue your great job, have a nice evening!
I love looking at these comments they give me love and support for my job as a cat lady. I love kissing hobos in the moonlight and eating rocks 🙂
I am not sure what this has to do with foam gliders but I find it harmless and fun.
wow my pet rock died yesterday and now i am very depressed. I need moral support. By the way, whats your daily hobo schedule?
Hellο! I’ve been reɑding your websіte for a wҺile now and finally got the courage to go ahead and give you a shout out from Porter
Tx! Just wanted to tell you keep up the eхcellent job!
akismet plugin
I want to to thank you for this wonderful read!! I certainly enjoyed every bit of it. I have got you bookmarked to check out new things you post…
How far does it go ?
Good question, should glide farther than FPG-9 glider but trying to throw one of these real hard it might loop. I had made some of my gliders into catapult gliders and had some pretty long flights. Flights were inconsistent because of too much flexing at high speed.
well, nice work man
I and my college tried to introduce paper glider for elementary school (using thick calender (used calender)). Join our group at FB Malang Paper Glider Club, maybe we can share a lot of “Flying Object”.
I think we have same mission “science toy from used material”
***********************************************************
* July 14 2015 *
* *
***********************************************************
From: Chuck Darling Date: Thursday, July 14, 2015
To:
Re: Two Gliders…
I built two gliders out of styrofoam last week.
The first gliders I’ve made in perhaps 20 years…
The day after the second glider, the news had a collision of
an F-16 and a Cessna.
I had a dream of viewing the collision of a military,
and a civilian plane,
perhaps a dozen years ago.
Then…
I was working on some Cindy Morgan music, and I saw
a video that I never viewed before.
Called “I Will Be Free” [Beautiful Bird 2008].
F-16 Cessna Collision
Cindy Morgan: I Will Be Free
Strato 5-cent Balsa Glider
I didn’t view the video until 2 days later…
It shows Cindy Morgan on a mountain with her father,
and he’s building gliders…
You really have to see it.
hello
Hi I really love this thing because my school is working on Balsa Wood Gliders and it is actually really helping me and my partner even though my partner is a brat that name is Sebastian.
Interesting stuff. I am going to build a glider from foam myself but I bought some 5mm thick flat sheets from my local 100 yen store together with a pack of bamboo sticks for a strong backbone that could maybe be catapult launched. Hopefully I can upload some results to the www later.
Hi
How does foam thickness affect flight and other things like ease of working, rigidity etc? I have 3mm foam plates as well as 1mm. 1mm look very thin and weak. What thickness would you suggest?
I have not measured the foam plates but I know some are thicker, 1 mm does sound too thin. It might be fun just to try both and see how it works out, you are not out much. Getting creases in the wing really helps the stiffness.