
Latest version of the Quicky Mousetrap using foam block chassis for a summer class entitled “Engineering Through Models”.
Introduction

Almost everything I know about mousetrap cars I can credit to reading this book from Doc Fizzix’s. I highly recommend purchasing this book and also a mousetrap car kit from Doc Fizzix’s. After building a good kit car, designing your own will be much easier.
 Doc Fizzix’s Basic Mousetrap Car
After building a couple of Doc Fizzix’s mousetrap car kits I designed several of my own cars although it was basically two different major designs and then small variations. The latest mousetrap car uses a foam block for a chassis, coat hanger wire for axles, and CD wheels. This design works well but it was designed mainly to be inexpensive. The Doc Fizzix’s mousetrap cars use more expensive materials such as brass axles and lever arm which is better.
In redesigning this mousetrap car webpage I wanted to introduce more of the educational physics aspect to mousetrap cars. My discussion is by no means completely comprehensive and that is why I suggest purchasing the Doc Fizzix’s mousetrap car book.
Phase II in My Website Articles
 |
 |
|
| Balsa version of Quicky Mousetrap Car from summer class a few years ago. | Teachers built Quicky Mousetrap Car at after school conference. |
During the first few years of working with my science related project ideas it was mainly about just getting the students to successfully build and operate the projects. Through workshops I have taught a fairly large number of mousetrap cars of my design have been built. I have learned much from this and have tried to improve on some aspects of my design. These mousetrap cars have also been built without my help in all parts of the globe.
It is my plan to expand on this and introduce even greater educational aspects that go along with the projects. This will be primarily in the area of physics and math applications. I will try to present this in a fun an easy to understand manner. In looking at the labs schools are doing with mousetrap cars it appears to be related with recording total distance and/or computing the acceleration during the run. A background in force and motion will be helpful which will include a discussion of Newton’s Laws.
How Does the mousetrap car work?
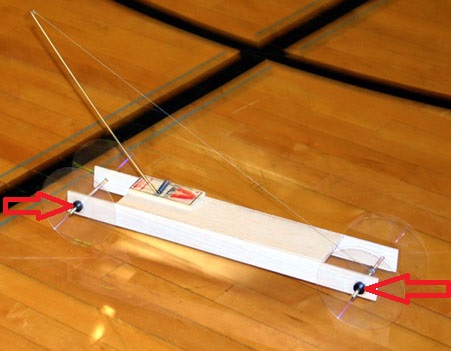
How the mousetrap car functions might appear very simple to people somewhat mechanically inclined but many people who see one of my mousetrap cars often ask, “how does this work”? The mousetrap car is propelled by the torsional elastic energy from the wound spring of the mousetrap moving a lever that pulls a string that is wrapped around one axle of the mousetrap car. As the lever pulls the string the axle turns as the string unwinds until all the string has been pulled through at which point the end of the string that was wrapped around the axle should release and the mousetrap car should coast for a distance because of kinetic energy until friction causes it to stop.
 |
 |
|
| Victor brand of mousetrap on the right is most often used in mousetrap cars. | Side view diagram of the spring with lever arm attached. |
 The lever arm which is attached to the mousetrap spring moves through a half circle which 180 degrees. The torque (amount of twisting force) decreases proportionally as measured farther out from the spring along the lever arm.

When the lever arm is pulled all the way back the torque will be the greatest. That is good because the car needs the extra force as it starts to move to overcome the opposing force of inertia (Newton’s First Law). This is potential energy with the lever arm pulled back as the mousetrap car moves this converts into kinetic energy. The force from the wound spring will decrease as the lever moves towards the opposite position from the start.
Physics Concepts
Hopefully you have identified that there are many physics concepts in this seemly simple model car. Let us outline some concepts that should be studied to understand the operation of the mousetrap car:
Simple machines – lever – wheel and axle : this relates to mechanical advantage .

Simple Machine – The Lever
 Simple Machine – Wheel & Axle
Mechanical advantage is the ratio of output force to input force which is a tradeoff between distance moved and the amount of force. Move farther out on input side of the lever and output side moves shorter distance but with more force. With the mechanical advantage working in the opposite direction moving a short distance with more force results in less force in the output but moving a larger distance. In the mousetrap car drive axle the small circumference spun by the string wrapped around it for a relatively short length propels the much larger drive wheels a much greater distance but with small amount of force. This is why the car must roll with little friction.
 In the mousetrap car the lever (lever arm) is connected to wheel and axle through a thin line.
Newton’s Three Laws of Motion
First Law – object at rest will remain at rest unless acted on by an unbalanced force. An object in motion continues in motion with the same speed and in the same direction unless acted upon by an unbalanced force. Law of Inertia
Second Law – states that force is proportional to acceleration but acceleration is inversely proportional to mass. The formula Force = Mass x Acceleration relates to this law and the unit of force is the Newton.
Third Law – For every action there is an equal and opposite reaction.
Relate This to a Mousetrap Car
First Law – mousetrap car is at rest, it needs an unbalanced force to start moving, any idea where this force comes from? If there were no friction it would continue to move in the same direction but the friction is an unbalanced force can you think of sources friction in the mousetrap car?
Second Law – the force is proportional to acceleration, thinking about the formula for torque a _____ lever arm would give faster acceleration? Acceleration is inversely proportional to the mass. This means the heavier the mousetrap car is the acceleration would be ______?
Third Law – for every action there is an equal and opposite reaction, in the mousetrap car the wheels push down on the floor and the floor pushes up on the _________?
Relate This to Real World Example
Check out my blog post: Newton’s Laws and the Hybrid Car

Terminology
Acceleration – most of the mousetrap car lab exercises I have seen deal with total distance and measuring acceleration.
Acceleration = rate of change in velocity
Velocity = rate an object changes position (vector quantity)
Force = Mass x Acceleration
Note Speed and Velocity are not the same:
Speed = rate that an object covers a distance (scalar quantity) Average Speed is just distance divided by time think miles per hour.
The faster the car is accelerating the larger the force but the larger the mass the larger the resistance will be to the acceleration. Think of how a large truck or a train is slower accelerating than an automobile.
Work – Power – Energy
Work is done when a force acting on an object causes a displacement of the object (it moves).
Power the rate which work is done Power = Work / Time standard metric unit of power is the watt. For a long distance mousetrap Low Power is desirable, work should be done over long period of time.
Energy standard definition is “the ability to do work”, this might not be too helpful. There are several forms of energy and often one form of energy can be converted to another. In the mousetrap car the potential energy in the wound spring (elastic energy) moves the mousetrap car converting to kinetic energy.
Constructing the Mousetrap Car
Understanding the physics of the mousetrap car should help in designing a more efficient operating mousetrap car. In building the mousetrap car you need to understand the basic components needed.
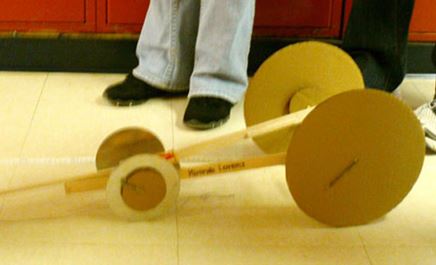
Chassis – frame of the car to which the other components attach to. For the mousetrap car it should be rigid yet lightweight. The first car I built I used a framework of bamboo which required additional bracing as the tension of the mousetrap pulling on the string across the length of the chassis was causing it to twist. The next generation of mousetrap cars was built from balsa wood and the current generation use a chassis made from a foam block.
 |
 |
|
| In the first prototypes of the bamboo mousetrap car I noticed that the chassis was twisting from the force of the lever arm pulling on the rear axle. | Bracing was added to stiffen the chassis which solved the problem. When the chassis twisted it caused the car to turn one direction. |
Hub – this the center of the wheel which attaches to the axle. The hub should hold the axle in the exact center of the wheel and the sides of the hub should be exactly 90 degrees to the axle otherwise the wheel will wobble.
 |
 |
|
| I made hubs from cutting squares from rubber tarp straps and drilling hole through the center. | Square hub is glued so as to cover the hole. |
 |
 |
|
| Faucet washers can fit in the hole of CD’s but I found the ones purchased through Doc Fizzix’s fit tighter. |
Faucet washers on Doc Fizzix’s mousetrap car. |


Axle – shaft is attached to the wheels though the hubs it should be straight as possible or the wheels will wobble. In the mousetrap car one axle acts like a pulley as the string is wrapped around it. The diameter of axle in relation to the diameter of the driving wheels is the mechanical advantage.

Wheel – mousetrap car rolls on wheels this is the geometric shape of a circle. This means you should understand terms such as diameter, circumference, radius, pi, rolling resistance, and rotational inertia. I have used CD’s, clear layers, and cottage cheese lids for wheels.


Large Wheels – using really large diameter drive wheels gives even larger mechanical advantage for greater distance.


Bearing – this is the contact point between the turning axle and the attachment to the chassis; the less friction in the bearings the more efficient the mousetrap car. With too much friction in the bearings the mousetrap the mousetrap might not even move or stop repeatedly.
Lever Arm
The lever arm extends from the mousetrap spring as a lever to pull the string. Three major considerations for the lever arm:
* Material, it should be very stiff but light in weight.
* Attaching to the mousetrap spring, there is a great deal of force where the lever arm is attached to the spring.
* The length of the lever arm is important, the longer the arm the more line can be pulled through and mousetrap car should go farther.
 The lever arm on this car is made from a square stock of a hard wood, originally I started with balsa with a T-joint but students were breaking the balsa. After handling delicate balsa structures in model airplanes it was not a problem for me.
Torque and Lever Arm Calculations for a Mousetrap Car
Torque has been defined either as a twisting force or the tendency to rotate around an axis. A common example of torque is tightening a bolt with a wrench. To know how much torque is being applied to a bolt a mechanics will often use a special type of wrench known as a “torque wrench” so a specified amount of torque can be applied to a bolt.
The formula for torque is very simple if the force is applied perpendicular to the lever: Torque = radius x force. Normally units of torque are foot pounds or newton meters. This equation gives the torque applied to the pivot point, this is the mechanical advantage concept.
I have been thinking more about how math could be used to predict an outcome. To start with a mousetrap car if you could calculate what force is available at the end of the lever arm based on the torque at the axis it would give you some idea on how much force is available to propel the mousetrap car. It is also interesting to see how the force decreases as the spring unwinds.
For a mousetrap car that will go a long distance the lever arm needs to be longer to pull more line that is wrapped around the driving axle. From these calculations it can be easily seen that the amount of force available rapidly diminishes as the length of the lever arm increases.
To me it is also interesting if you can measure calculated outcomes and think about the reasons for inaccuracies. For this experiment inaccuracy was related to the spring scale I was using and how I was using it. Doc Fizzix sells a torsion wheel to measure the torque of the mousetrap spring. Link to Torsion Wheel product.
For my experiment I measured the force in grams at 4 centimeters from the axis at 25, 90, and 180 degrees. I then measured at 28 centimeters from the axis and then calculated what the force should be based on the measurements at 4 centimeters. Measurements were also taken at 28 centimeters so a comparison could be done between the calculated and the measured. Fairly close results.
GF*CM is the torque, dividing by the radius gives the force. Example: 1600 / 28 = 57.14, 3200 / 28 = 114.29, and 4400 / 28 = 157.14.
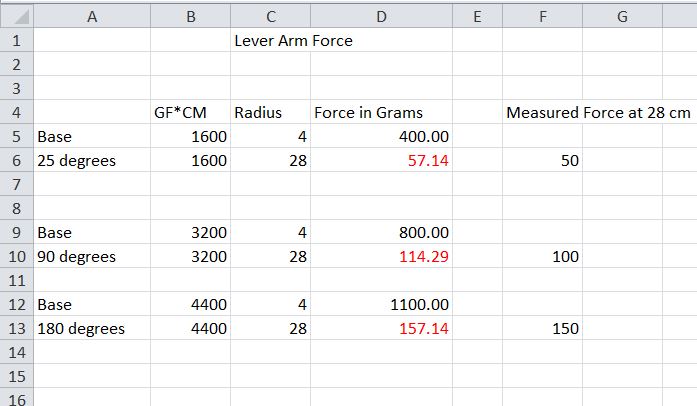
Above are the comparisons of the measurements and the calculations which appear in red.

Measured Forces on Lever Arm at 25 Degrees
 Measured Forces on Lever Arm at 90 Degrees

Measured Forces on Lever Arm at 180 Degrees

The concept of torque is also important in flight like in this quadcopter, check out my article Basic Quadcopters.
Notes on Units
Many times formulas are based on units other than those you have collected your data with. My spring scale does display Newtons also but grams are a much smaller unit which helps in taking more accurate measurement.
For Example to Compute the Potential Energy of Torsional Spring, conversion to Newtons, meters, and radians are needed.
1 gram = .0098 Newtons
Radians = (degrees * π) / 180
1 centimeter = .01 meters
1 joule = force of 1 Newton through a distance of 1 meter
- Blog Article 10-10-2017 Mousetrap Car Demonstration at Nursing Home
Your work is quite good
yyyyyyyyyyyyyyyyyyeeeeeeeeeeeeeeeeeeeeeeessssssssssssssssssssssssss
It was pretty good
cool stuff- good work on the article
Excellent source of student language information. Great project for my 5th grade students. Excellent job!
Awsome site! I am loving it!! Will come back again. I am taking your feeds also.
I LOVE THIS WEBSITE. I USED IT FOR MY PRIMARY CLASSES.
What is a primary class?
-Wolf
Thanks for this info, sadly for our project we can’t use kits. But what do you recommend for the axles? I have been having trouble with them.
-Wolf
If you look at my design for mousetrap car I used coat hanger wire, try to find straight sections. Better kits use brass tubing. Then you need a hub, on my design I cut sections of rubber tarp strap and drilled a hole in it. For bearing I used the metal screw eyes/
very goo I got our mouse trap car idea from this website thanks mr miller these are great ideas
this is so awesome broski
this website is so helpful!
so helpful!!
Soooooooo helpfullllll! Actually it really showed me what I could do for my own
Thanks for creating this! This is pretty Helpful! 😀
Its helpful because even when ur building one in science
SO AWESOME
thats really cool i like it great job
that is really cool
great i love it
l love it so much i mad 24 cars i love the experiences it is life changing
cool
Excuse me! I love your work, but could you please tell me when you published this article? Thank you!
This webpage on mousetrap cars was redone last year, I had a somewhat different webpage for several years.
How do you true the wheels, axels and attach-point on the chassis ? Despite all my efforts, the wheels and chassis still have wobble to them and the car doesn’t drive in a straight line. I found it very difficult to get everything centered and aligned on all axis.
Crush, that was a good question. Wheel wobble has to to do with how straight and solid the hub axle joint is. You need to make sure the wheel to the axle is perpendicular, that is like a “T”. The axle alignment with the chassis of the car has to be that way also. Some method of adjusting the steering and then setting it may be desirable. On my design I used the screw eyes in a way small adjustments could be done on the tracking. Some Doc Fizzix cars pivot the front axle and then allow you to tighten it down.
very helpful got an A on my project and im in 7th grade
Thank you Jacob in 7th grade, it makes my effort seem worthwhile.
Over-tightening could be in the same way harmful because under-tightening. Examples include motors as well as equipment assemblies.
This was a great help for me in science or I probably would of failed science!!! Very descriptive and easy to understand as well. Thank you!!!
This is the best website I have ever seen! OMG!
Mousetrap McGee somehow I doubt you are building a mousetrap car every 4 hours, but I can’t stop laughing reading your comment.
Do yuo doubt me? I got over 700 hundred and countingg. I typing with one hand becuase I’m making mousetrap cars with the other. I’m beginnning to think I hava problem. Please help me bill. your my only hope. 🙂 🙁 🙂 🙁 ;0 😉
i like your thinking
-wolf
I used to not know how to make a mousetrap car. This article has changes my life. Now I make a mousetrap car every 4 hours. This article has brought meaning to my life. Great Googly Moogly I never realized how awe-inspiring mousetrap cars can be. Golly Josh Darn it why didn’t I find this page before. Now my warehouse has approximately 352 mousetrap cars and counting. 🙂 🙁 🙂 🙁 ;0 😉
These mousetrap cars have ruined my life. I worked with my son to make one and he proceeded to show his friends. Now the whole neighborhood is littered with these things. I have gotten several complaints and even threatened with a lawsuit from my neighbors for harassment and assault from the injuries inquired from the mouse trap. Every morning I wake and slip on a mousetrap car down the stairs, I have been to the hospital three times and my wife threatens to leave me. Last weekend, a mousetrap car took my job and I am on the verge of losing my home. Why hasn’t Obama stepped in to clean this mess up? The federal government fails it’s citizens once again.
You’re a legend
im screaming, is this real?
I’m planning to use this idea for a summer camp. If I have the kids from 9am to 4pm, is this a 1 day project? Or multi-days??
I have been doing it within one 1 1/2 hour class. This didn’t give much time to run the cars.
Thanks for the time frame, what age group does this in one 1-1/2 hour class?
I did grades 5 through 8th in summer class but it was a rush to get all cars constructed and run in 90 minutes. It goes pretty fast using hot glue gun.
this is good
this site was helpful
legendary
I made 500,000 mousetrap cars and counting. I have been making them since last year and I absolutely love them. I have caught around 100,000 mice from my house and garage in total.
100,000 you say? Seems quite excessive don’t you think?
😛
That’s not just logic. That’s really senbesli.
very helpful, thanks 😉
very helpful, thank you for your help
Thank you, I am trying to reference this site, can you tell me the date this page was created?
From the editor I see: Published on: Dec 13, 2013 @ 11:36
Bill Kuhl
Realy helpful best site there is :3
The only truly good website for mousetrap cars there is, good for science fair projects! :3
OMG best website ever! thank you! <3 🙂
OMG best website ever! thank you! <3 🙂
Good article
Hello there. Maybe you could help me solve a problem on mousetrap car. Do you have any idea on how to turn the wheel of a mousetrap car?. The problem is we need to avoid an obstacle 1 meter away and should get back to the line of distance from where my car starts. The longest distance the car traveled from the obstacle is the winner. The vehicle must start from behind a start-line and then clear an obstacle as it travels the longest possible distance in the longitudinal direction from the start line. The device must come to a rest as close as possible to a point directly inline from its start location (i.e. minimise the transverse distance)
There was a rubber powered event that had to go around an obstacle but you could make the steering adjustable to a fixed setting and then curve around the obstacle. As far as stopping at a certain point there is a Doc Fizzix car like that which uses a threaded rod and a wingnut. One side of the wingnut goes in a channel. You adjust where wingnut starts and when it gets to one side it stops the car.
-This Is Epic I Got Everything I Needed … THANK Yu 😉 🙂
hahhahahahahahahahha
Thanks.This is really useful information.Keep the good work up.
Excellent goods from you, man. I’ve understand your stuff previous to and you’re just extremely magnificent. I actually like what you’ve acquired here, really like what you are stating and the way in which you say it. You make it enjoyable and you still care for to keep it wise. I cant wait to read far more from you. This is actually a terrific site.
I dont know what a mouse is.
A small rodent or a computer pointing device.
Glad to see such a informative post. I am going to bookmarks this and read it later.
what do u need to build his and how
This is how I built a mousetrap car, later version I used a foam block instead of balsa framework.
Mpousetrapcar Build Instructions
what do u need to build his and how do you do it intructions plezzzzzzzzzzzzzz
this website is very helpful, i’m doing a project in science and i’m in grade 8 this will definitely help my partner and I!! 🙂
Some further thoughts on mousetrap car engineering.
A concern here is traction. A strong force will break the static friction of the wheel against the floor and the wheel will spin without corresponding translational movement. To engineer this, we must understand static and dynamic coefficients of friction. These can be measured and included in the force and energy analysis.
The static coefficient of friction is measured by pulling the car across a level floor with a spring scale. The wheels are locked so they can not turn. Increase the pull until the car begins to slide. The force at which the car begins to slide divided by the weight of the car is the static coefficient of friction. It will have a value less than 1. Once the car begins to slide, the force to keep it sliding will be less than what was required to start it. The minimum force required to keep it sliding divided by the weight is the coefficient of dynamic friction. It will be less than the coefficient of static friction. The same can be done with the wheels free to turn. You will get a result for the force required to start it rolling and a result for the minimum force required to keep it rolling.
The tractive force depends on both the coefficient of friction and the weight. Increasing either will increase the tractive force. Increasing the weight will have other consequences. In particular, it will increase the bearing friction. There will be a tradeoff. Finding the optimum will require some careful analysis. You want a large static friction for best traction. One way to do that would be to stretch rubber bands around the perimeter of the drive wheels. Another thing you might try would be to glue strips of sandpaper around the perimeter.
You want the lowest value of rolling friction. This has largely to do with the friction in the bearings. Lubrication and bearing design can reduce bearing friction. Ball bearings would be better than eye or tube bearings.
Another way to measure coefficients is with an inclined plane. You would need a board with the same surface material as the floor, or at least with the same coefficient of friction. Place the car on the level board and slowly raise one end until the car begins to move. Work out the force diagram for the angle of inclination to find the components of weight parallel with the board and perpendicular with the board. The component parallel divided by the component perpendicular is the coefficient of friction.
we don’t need a essay we are doing this for fun or for a science project we don’t want a full lecture on this
The Doc Fizzix book discuses friction and shows the measuring on an incline plane, I tried that but did not have an accurate enough scale.
Do yuo doubt me? I got over 70,000 and countingg. I typing with one hand becuase I’m making mousetrap cars with the other. I’m beginnning to think I hava problem. Please help me billy. your my only hope. ;0
I used to not know how to make a mousetrap car. This article has changes my life. Now I make a mousetrap car every hour. This article has brought meaning to my life. Great Googly Moogly I never realized how awe-inspiring mousetrap cars can be. Golly Josh Darn it why didn’t I find this page before. Now my warehouse has approximately 73,856 mousetrap cars and counting. ;0
Thanks for sharing this.i can remember my school days by seeing this