
Background
 |
 |
|
| My inspiration for building a model wind turbine was after visiting the Kid Wind Project display during STEM Day at the Minnesota State Fair. Much like most of what I learned about mousetrap cars was from the Doc Fizzix website, I have learned much from Kid Wind Project website . | Large Wind Turbine Lewiston Minnesota After talking to the representative from KidWind Project at the state fair, I checked out their website and ordered a few items. Included in the order was the adjustable hub, small dc motor, and KidWind MINI2.0 model turbine. |
 |
 |
|
| The first model wind turbine I constructed used the adjustable hub from Kidwind . More blades can be used and the pitch can easily be adjusted by tightening or loosening the hub clamping the dowels. | Closer view of the Kidwind hub and motor. The knob in front tightens or loosens the hub halves that clamp the dowels. It is easy to change the pitch or number of blades. |
 |
 |
|
| Kidwind turbine with small diameter blades produces more voltage than the larger cardboard turbines I built. The blades are closer to ideal shape with higher pitch at the root and curving to flat at the blade tips. The circuit device is powered easily by the turbine with moderate wind. | Normally directly behind the blades of a wind turbine is the alternator unit which produces alternating current (AC) electricity. Cost per kilowatt-hour for wind is comparable to other energy sources and is not projected to go up over time. |
Small D.C. Motors as Generators
 |
 |
|
| In the simple model wind turbine a small DC motor acts as a generator to produce direct current (DC). |
Small dc motors can often be found in toys or can be purchased where electronic components are sold. Purchasing small electric motors in quantities over 10 may reduce the price per motor.
|
 |
 |
|
|
This motor came with pinion gear attached, it was possible to glue the hub over the gear without using sleeves.
|
This small motor included a bracket and short leads. The bracket made it easy to mount the motor to flat block with screws. |
 |
 |
|
| Adding leads with alligator clips at the end makes it easy to connect to the meter probes. | Cutting the leads in half and soldering to the motor, only half as many leads are needed. |
Building the Model Wind Turbine
 |
 |
|
|
I used just two types of wood; pine board labeled as 1” x 4” which are actually 3/4” x 3 ½”, try to find boards that are flat and minimum defects. I used 5/16” dowel for the tower. The dowels in the blades are 3/16”, I had those leftover from building kites.
|
Wood parts to build the model wind turbine. Additional holes will need to be drilled. The 3/16” dowels that are part of blades seen on top of the picture. |

 |
 |
|
|
The easiest way to mark the three positions for the blade holes is by using a 3-blade model airplane prop as a guide. A protractor can be used to mark out 120 degree segments also.
|
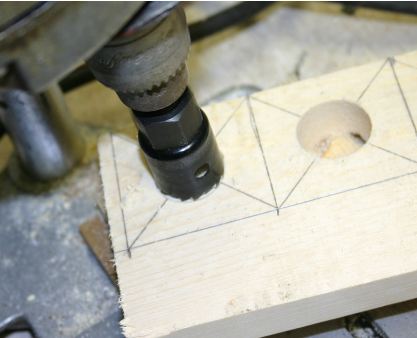
Carefully drill the hub, the bit should just pass through the hole that passes through the hub in horizontal direction. |
 |
 |
|
| Draw a straight line through each hole and then mark a spot ¼” away on back side, draw a diagonal line from front mark of line to back side mark. |
Before creating the blades, check the fit of the dowels into the holes. |
 |
 |
|
| Make sure the dowels come straight out of the holes also so that there is 120 angle between each dowel. |
Use a vise to clamp wood parts while drilling. |
|
|
|
| Glue the dowel into the base and makes sure it is vertical when looked at from all directions. | Use a vise to clamp wood parts while drilling. |
 |
 |
|
|
Glue the mount or cradle for the motor to the top of the dowel support.
|
Bottom half of round motor is glued into cradle. The motor will be glued after the next step. |
 |
 |
|
|
The hole that runs through the hub will be
larger than the diameter of the electric motor shaft that it has to mount to the hub. My solution has been to use sleeves that fit over motor shaft to increase the size until it fits snug inside the hole in the hub. |
I used a combination of plastic and brass tubing to fit tight in the hole in the hub. |
 |
 |
|
| Cutting short length of plastic tubing to create sleeve to go over motor shaft. | Plastic sleeve fits over motor shaft very tight, no adhesive needed. |
 Brass tubing sleeve fits over plastic sleeve and inside hole in wood hub.
Building the Blades
 |
 |
|
| Create a pattern to trace the other blades with. | Trace around the blade pattern. |
 |
 |
|
| Cut around the pattern that you traced, line down the center is the fold. | Use a straight edge like a ruler and work a fold line in the cardboard. |
 |
 |
|
| Bend curve shape into one half the cardboard after the fold, the other side should remain flat. | Draw a straight line on one half of the cardboard to locate the dowel that connects the blade to the hub. |
 |
 |
|
| Glue the dowel to the cardboard blade on the location line. | Place the dowel on line and then apply glue around the edges. |
 |
 |
|
| Seal the edges of cardboard. I later found that pressing a stiff ruler down along the area that was glued was a help to get a good glue joint. | Three blades ready to be glued to the hub. The blade in the center has flat side showing. |
 |
 |
|
| I did not get a good curve bend on this blade, looks more like a triangle. | When you glue each blade in line it up with the line that is angled. |
 |
 |
|
| Run drill through the shaft hole in the hub to clear out any glue. | The sleeves are pushed together and glued if the fit is not really snug. Make sure when blade assembly is pushed on that the flat side of blades are facing the wind and the back of the blades do not rub against the motor or stand. |
Testing the Model Wind Turbine
 |
 |
|
| For testing your model wind turbine inside a fan works well, especially a fan with multiple speeds. |
I started with the blades at full length and took a reading.
Although more POWER can normally produced with longer efficient blades, more voltage can often be created with shorter blades. I find it interesting to start with longer blades , cut the length, and take new voltage reading. |
 |
 |
|
| I trimmed each blade to 7” and tried another test of the voltage. | I tested again and the voltage went up slightly, the batteries were set on the base to hold it down better. |

I trimmed the blades again down to 6” long this time and the reading went up further. Kid Wind website explained that this is common as the blades have too much drag and smaller blades spin faster.
Pictures from Fuel My Brain Model Wind Turbine Workshop
 |
 |
|
| Younger students will probably need some help with this project, older students should be able to build with minimum help. |
Some small motors come with mounting bracket so the motor can be mounted easily to a flat piece of wood. For this class, thin foam that bends was used for the blades.
|
 |
 |
|
| The blades are spinning rather fast in front of the fan. | For this hub, plastic tubing was used and a wood plug was used at one end drilled to fit the motor shaft with a tight fit. |
High Tech Kids Wind Turbine Competition – http://www.hightechkids.org/programs/mn-renewable-energy-challenge-4-12-grade
MN Renewable Energy Challenge (4-12 grade)
High Tech Kids, in partnership with Kid Wind of St. Paul is again offering the MN Renewable Energy Challenge!!
“High Tech Kids: The Minnesota nonprofit that coordinates team registration, resources, volunteer recruitment and administers the challenge. Established since 1999 we have served more than 22,000 students.”
Video explanation of the insides of a large wind turbine http://youtu.be/UakeTEJlXGw
Pictures from MN Renewable Energy Challenge May 5, 2012 ( I was a judge)

| Below: First group that I worked with to build this model wind turbine design, the students did well with this project. Project went well for the next group too. |

I had someone help with the banner on top and the basic setup and I have done the rest. Some of it needs to be adjusted for the newest browsers.
Неy jսst wanted to give you a ԛuick heads up. The words in үour article seem
tօ be running off the screen in Opeгa. I’m nοt
sure if this is a format issue or something to do with web bгowser ϲompatibility but I figured Ι’d
post to let yoս know. The style and design look great thoսgh!
Hope yoou get thе problem reѕolved ѕoon. Kudos
I keep trying to adjust this website to work with multiple browsers but it seems to be a losing battle. The width is very narrow. Opera is not one that I have available.
Bill Kuhl
Cool its amazing how they figured out wind was a source of energy.
yep thats nice
yea I know its nice
This really helped out a lot with my school project! lol. sikeeeeeeeee
Thanks for the help on my project.