
Building a model plane from materials other than balsa has been a challenge I have experimented with for some time. I built a couple of radio control planes that use foam board for part of the construction including one plane with a 9’ wingspan powered by a chainsaw engine. Another radio control plane I designed used mainly cardboard in the fuselage. More recently I built a foam catapult free flight glider I named “Foam Jet II” because it had jet-like style. After some revisions, Foam Jet II flew rather well but I thought it was really more work building than most people would want in a foam glider. To build the wing you had to splice several sections of foam plates together and then reinforce with clear tape.

Back a few years with plane I designed with foam board used in fuselage over a pine structure.
Download Plans in PDF Format:

Hammer Down catapult glider was based on my discovery that you could build a foam wing from a meat tray with a crude airfoil shape by pounding part of the wing with a hammer. A further discovery was that it was possible to bend the dihedral in the wing just by pressing hard through the center of the wing. For a wing span of only 9” the wing was stiff enough to withstand a moderate speed catapult launch with no reinforcing. Like Foam Jet II, no balsa is needed in this plane at all. The cost to build is almost nothing and the materials are easily obtained from recyclable materials.

|
|

|
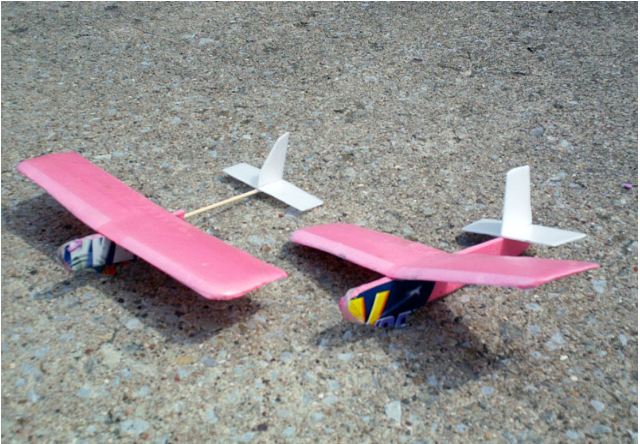
| Two of the prototype gliders, the first glider in the foreground did not have the bamboo skewer boom. |
|
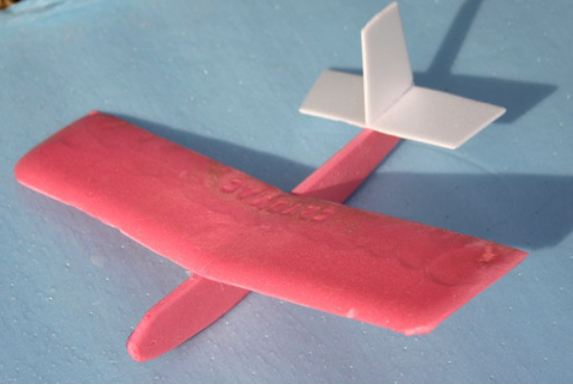
This the first glider I built entirely from foam. When the cardboard doublers were added to strengthen the nose area, the foam would break behind where the cardboard left off. |
 |
|
 |
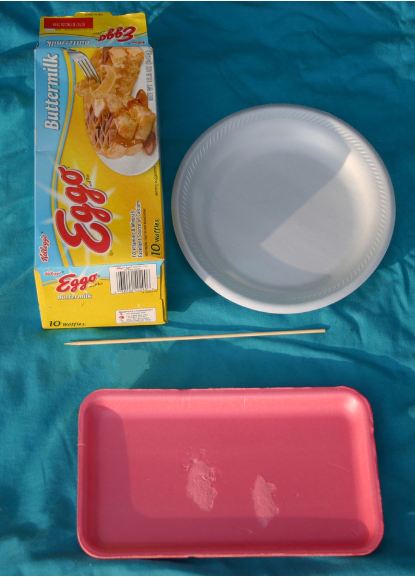
| The basic materials needed to build Hammer Down foam catapult glider. |
|
These are how the skewers I used for the tailboom were packaged, the smaller ones to the right in package were used. Should be able to find these in most grocery stores.
|
 |
|
 |
|
I would suggest using a slightly smaller foam tray for creating the foam pods so that all available larger trays can be used to make wings.
|
|
Low temp hot glue gun can be used for the entire
construction. |
 |
|
 |
|
The wing of the foam glider is made a foam meat tray that measures approximately 10 3/4” By 5 3/4”. Wash the tray thoroughly and remove any stickers.
|
|
One tray will make two glider wings. Use a sharp blade to cut wings instead of a dull one like I used for these wings resulting in a jagged edge. |
 |
|
 |
| Mark half way across the back of foam tray. The foam tray will be split in half lengthwise. |
|
It might be easier to cut foam sides after cutting the foam tray in half, I have tried cutting foam sides first also. |
 |
|
 |
| The sides of the foam tray are cut so there is a flat surface all the way across, turning the tray over there will be a nice curve for the leading edge . Use a very sharp blade and be careful not to cut yourself. |
|
If the first cut did not get the side trimmed down flush, carefully trim until it is flush.
|
 |
|
 |
|
Hammer down, that is how the airfoil is formed. Starting in the middle of the chord hammer the length of the wing, harder towards the trailing edge. This compresses the foam and the shape seems to hold.
|
|
Creating the dihedral, the V-shape that helps with stability is created by pushing in the center of the wing with your thumbs. |
 |
|
 |
|
Looking at the back of the wing it is easy to see the dihedral bend. This wing should hold up to catapult launches with 1/8” rubber, do not try ¼” rubber, it will break.
|
|
The foam for the nose can be cut with a sharp knife although it no doubt will take more than one pass through the foam which is around ¼” thick.
|
 |
|
 |
| I have been experimenting with using a hot wire foam cutter which is sold where model railroad supplies are sold. |
|
Hot wire cutter worked well if you can keep template from moving around while cutting. |
 |
|
 |
| The sharp end of a bamboo skewer is poked straight into the rear of the foam nose. Be really careful that it goes in straight as possible. |
|
Put hot glue in the hole in the foam created by pushing in bamboo skewer. |
 |
|
 |
| Again check the alignment of the bamboo skewer before hot glue is hard. |
|
Check alignment from the top, if it is not straight it will cause the glider to turn one direction. Aslo, check from the side the alignment of the bamboo skewer, if it is not straight it can cause the glider to dive or stall. |
 |
|
 |
| If you trace the cardboard doublers in this manner, the shiny side will appear on both side of the glider. |
|
|
|
The cardboard should cut easily with a scissors. |
 |
|
 |
| Work fast spreading the hot glue out evenly on the foam nose pod. |
|
Doublers are glued on both side of foam nose pod, this must be done quickly as hot glue sets up quickly. |
 |
|
 |
| Squeeze hot glue in gap between cardboard doublers underneath foam nose pod. |
|
Pinch the doubler halves together quickly, this forms the catapult hook. |
 |
|
 |
| The stabilizer and vertical fin are cut from foam plate material. Cardboard used for template for tracing. |
|
The thin foam of the plate can be easily cut with a scissor. |
 |
|
 |
| Bamboo skewer is cut off 3 ¾” from the rear of foam nose pod. |
|
Stabilizer glued to rear of bamboo skewer. |
 |
|
 |
| Make sure the stabilizer is not high on one side as would appear to be the case in this photo. |
|
The vertical fin is glued to the top of the stabilizer. |
 |
|
 |
| Check the alignment again of the tail surfaces. |
|
Hot glue small sub-fin that is used to pull the plane back for catapult launch. |
|
|
 |
| Measure from the rear of the foam nose pod ¾” for the location of the trailing edge of the wing. |
|
The bottom of the wing is glued to the top foam nose pod. Make sure to locate the center of the wing so one half is not longer than the other. |
 |
|
 |
| No doubt additional nose weight will needed to be added to arrive at the proper center of gravity location. |
|
|
|
Completed glider, ready for trim
adjustments. |
Notes on Trimming
Small adjustment that are made to your glider will make the difference between a glider that goes a few feet and one that will fly well.
Trim adjustments have to be very small on a glider that goes so fast right after
launch. You can put small bends into the trailing edge of the wing or the
rear of the stab. My glider has been trimmed to turn slightly to the left, I
bank it to the right on launch. The glider turns gradually to the right on
the way up and then turns to the left gradually on the way down, just before the
glider was ready to stall. Launch at no more than 45 degree angle, otherwise it will either loop or come straight down after it reaches the top of the launch.
 |
|
 |
| Making up parts for upcoming workshops. |
|
One of the projects in College for Kids class |
 |
|
 |
| Park & Rec Summer Camp Assemble Gliders |
|
Flying outdoors after construction. |


I think you are missing an opportunity to teach you first timers conventional building material and techniques… Foam airplanes are a trap because…..
1… foam is rotten structural material and flexes all over the place so flights are inconsistent.
2. Your students will have to unlearn glueing wait times and glue application when they switch to balsa and Duco cement.
3. you need to teach trim tactics…. trajectory observation and trim actions to correct things…ie cg location, wing warp, rudder offset, tail tilt …..lots easier to warp, or cut and glue balsa than foam. And cut/glued changes stay put.
I understand what you are saying about the foam flexing. Balsa really is the way to go to learn to be a real model airplane hobbyist. In the short – one time model classes I have taught, I have had more trouble with the kids breaking the balsa airplanes and then I run around spending so much time trying to repair with CA. After I had a build session for the foam gliders with the park rec group some kids were carrying their gliders around for a week to and from camp.
Foam isn’t a “rotten structural material” if you use it like foam instead of like balsa. Foam is a good structural core. It needs reinforcements where there are significant loads, but if those reinforcements are on either side of a foam core, they can be very thin and light. A foam wing built with this idea can be stiffer, stronger, and lighter than a solid balsa wing. Especially if you can’t get light balsa.