Foam Templates – Click here to Download
Climbing to another amazing flight.
Note: I lost the first one of these airplanes 7-25-2015 in a thermal. At almost 3 minutes on the stopwatch I could no longer see the airplane as it was so high.
9-18-2015
“Well, I just put a first flight on Bill’s foamie and lost it OOS at 2 minutes 20 seconds. I wound 750 turns into a 3/32 motor. It is about 10 mph winds so the drift is more the reason than anything. It had my home made 2 liter bottle prop too. I guess my prop worked well. I hated losing the prop more than the plane. The rubber unwound at about the 1 minute mark.
Great design Bill. My designs have flown around 1 minute 30 seconds and they don’t have an airfoil. Paul”
Fantastic Foam Flyer Mention in December 2016 Aeromodeller magazine article by Jon Kemm
10-20-2015
“Hello, I enjoyed your project about the foam flyer! Your website included basically everything a teacher/parent/student should follow starting from clear directions to pictures. Now, what grade level for students do you feel appropriate this task? I would love to have my students make this one day. ”

6/7/2015
” To my delight, no trimming was necessary for the Flyer! No ballast or trim tabs necessary. And I built the plane strictly according to your plan. The best flight time for the Flyer was at least 2 min 20 sec. I say at least because I lost sight of it when it was just above the tree line at the edge of the field, about 3 tenths of a mile away, and I stopped the stop watch then. After about 20 minutes of searching, I fortunately finally found it at the edge of the field.”
Introduction
I have been on the quest to come up with better simple free flight model airplanes that kids could build quickly and fly immediately after construction. Starting with the FPG-9 foam plate glider introduced to me by the AMA, I have been working with foam plate material. I do like building with balsa and covering with tissue but in the model airplane classes I taught, I spent too much time repairing broken airplanes. The foam planes built with minimal balsa have proved to require less repair, and if I created the balsa fuselage, students only needed scissors and glue gun to build the model.
Proportions for the Fantastic Foam Flyer were influenced by what I was seeing in the better flying simple rubber balsa models, mainly a longer fuselage. Besides better stability the longer fuselage allowed a loop of rubber to not extend past the distance between front and rear hooks yet still take a good number of winds. I have found that unless the kids are using a winder, the extra slack in the rubber loop gave them problems.
Consistently the flights of this plane built by myself and kids in a summer camp recently have been great. Outdoors it will climb to a good height very quickly which is always exciting. With the foam you can bend surfaces for trim adjustments. I hope to hear back from other people that build this airplane.
Update 12-01-2015 – Fantastic Flyer is Mentioned in this Book:
“The Fantastic Foam Flier -Bill Kuhl, who is the brains behind the foam plate airplane, has shared this brand-new design, which is super stable and utilizes balsa and foam in its construction.”
Materials Needed

9″ Diameter Foam Plates 5 1/2″ or 6″ Diameter Propellers 1/8″ thick Balsa

Paperclips for Rear Hooks Rubber Strip 1/8″ for Outdoors
Tools Needed
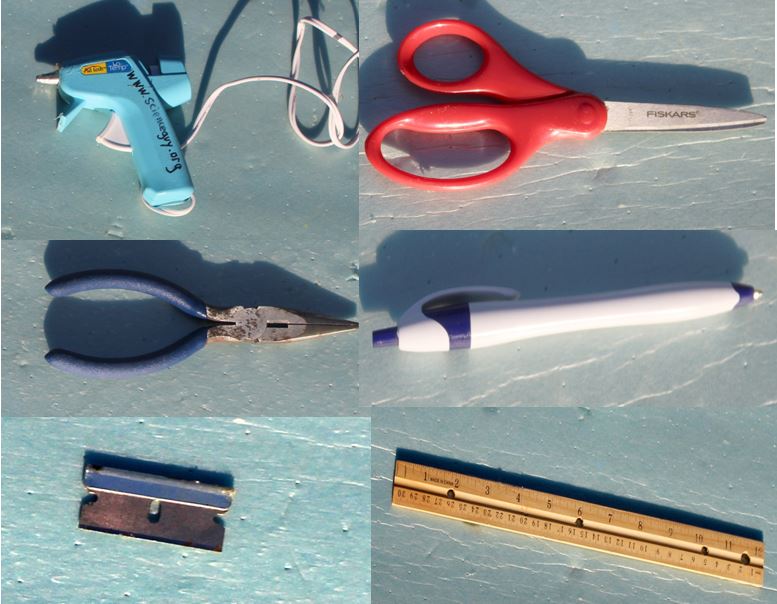
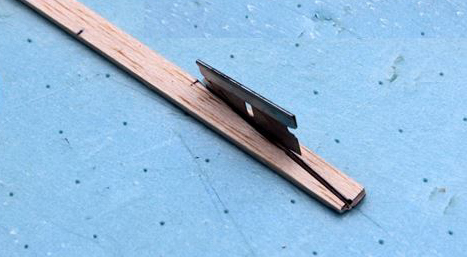
For fast assembly I use low temp hot melt glue guns. Foam plates can be cut with a scissor. To bend the rear hook a needle nose pliers is needed. Parts are traced with an ink pen. To cut the balsa for the fuselage a razor blade or modeling knife can be used. A stiff ruler such as this wood ruler is used to bend the wing crease and for measuring.

Balsa strips can be cut with knife or razor blade but it is also possible to purchase 1/8″ x 3/8″ x 36″ balsa strips. Using a balsa stripper makes cutting the strips an easy task.

For a recent class, I pre-made the fuselages, traced patterns on the foam plates, and installed the rear hooks on the balsa fuselages. Now the students did not need to bend the wire or cut balsa with a sharp blade. The only tools needed were a scissors, ruler, and hot glue gun. I cut and tied the rubber strip because students have trouble tying knots.
Fuselage
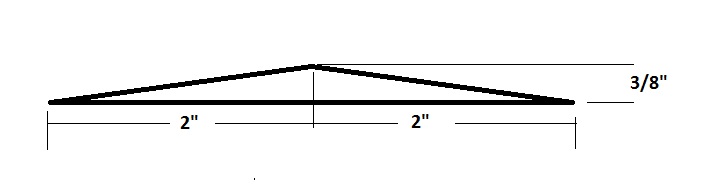
I will start here in case you wish to build the fuselage for a group ahead of time like I did. The 3/8″ x 1/8″ x 36″ sticks are cut to 16″ long. This will give enough for two fuselages, leftover material can be used for cutting the wing pylon mount.
Bending the Rear Hook
I usually bend the rear hook out of paperclips but the rear hook could be bent from a straight pin or music wire.

With the paperclip flat on a surface bend the smaller inside part of the paperclip up 90 degrees and then cut it off.
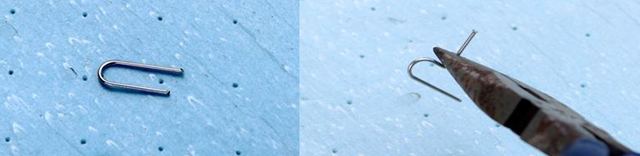
With the larger section leftover hold that section perpendicular to flat surface and bend the top part up about half way back up 90 degrees.
Cut off the bottom portion of the wire even with the portion that is now pointed up. Bend up a small portion at the end of the bottom portion.

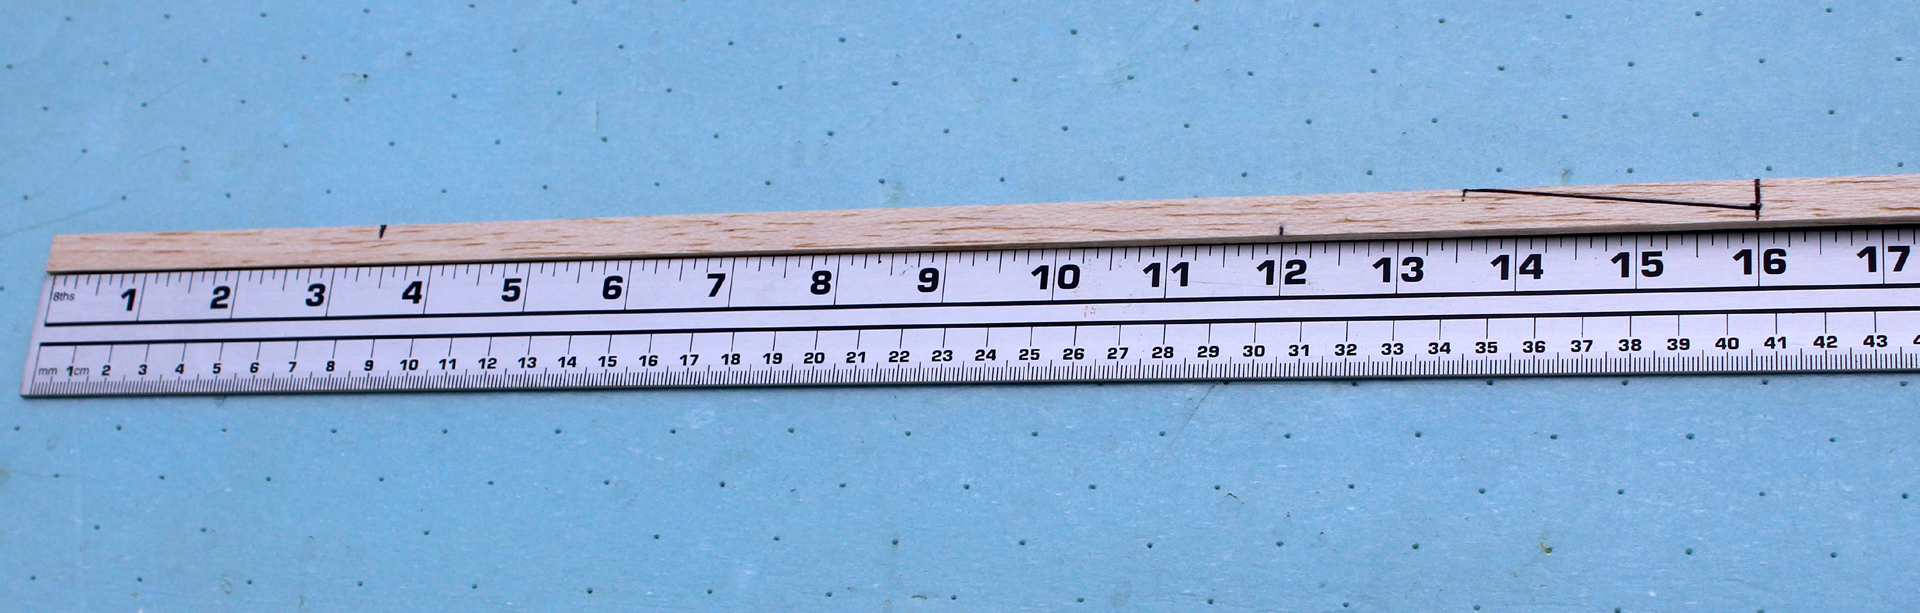
Cut a 16″ length of the 3/8″ x 1/8″ x 36″ balsa straight across. Markings for the pylon wing mount and the taper at the rear of fuselage can be done before or after the 16″ length is cut.

Mark from the left side of the balsa 3 1/2″ for the position of the front of the wing pylon mount.

Draw the angle on the rear of the fuselage, starting at the right end mark on the top 2 1/2″ to the left. From the bottom at the right side of the balsa mark up 1/8″. Then draw a slanted line between those two points.
Now if you have not cut the 16″ length yet, make that cut and then the angle cut.
Wing Pylon Mount


Cut the wing pylon mount from leftover 3/8″ x 1/8″ balsa if available.

Glue wing pylon mount to top of fuselage at spot marked previously.

Create a hole for the rear hook to go into the fuselage bottom by using a push pin first.

Try placing rear hook into balsa and remove. Now put glue in hole and in area where hook will rest on balsa. Insert the rear hook again. The rear hook needs to be pushed down farther than shown in this picture. Extra wire sticking out the top can be cut off.

This is what the fuselage should look like.
Download: Foam Templates in PDF format.
Tracing the Foam Parts


Four 9″ foam plates are required to build the airplane, I cut out thin cardboard patterns and trace on to foam plates with ballpoint pen. Cut foam with a scissors.

This is what the foam pieces should look like.
Building the Wing

Bend all three wing panels at the same place with a straight edge. Ease the bend in slowly as the foam can crack if done too quickly.


Glue the edges of the foam wing panels together and block in dihedral before glue hardens.

Panel blocked up to proper dihedral angle of 2 inches.
Final Assembly

Glue the vertical fin on the slanted area at the rear of the fuselage, leave a small part of the rear of the vertical fin hand past the rear of the fuselage so this can be bent as a rudder trim tab.

When this has setup, turn the fuselage over and glue the stabilizer on.


Glue the wing on the wing mount pylon, the bend in the bottom of the wing should match up with the high point of the wing pylon mount.
Note: Watch steps for gluing foam surfaces in 20 seconds in this video.
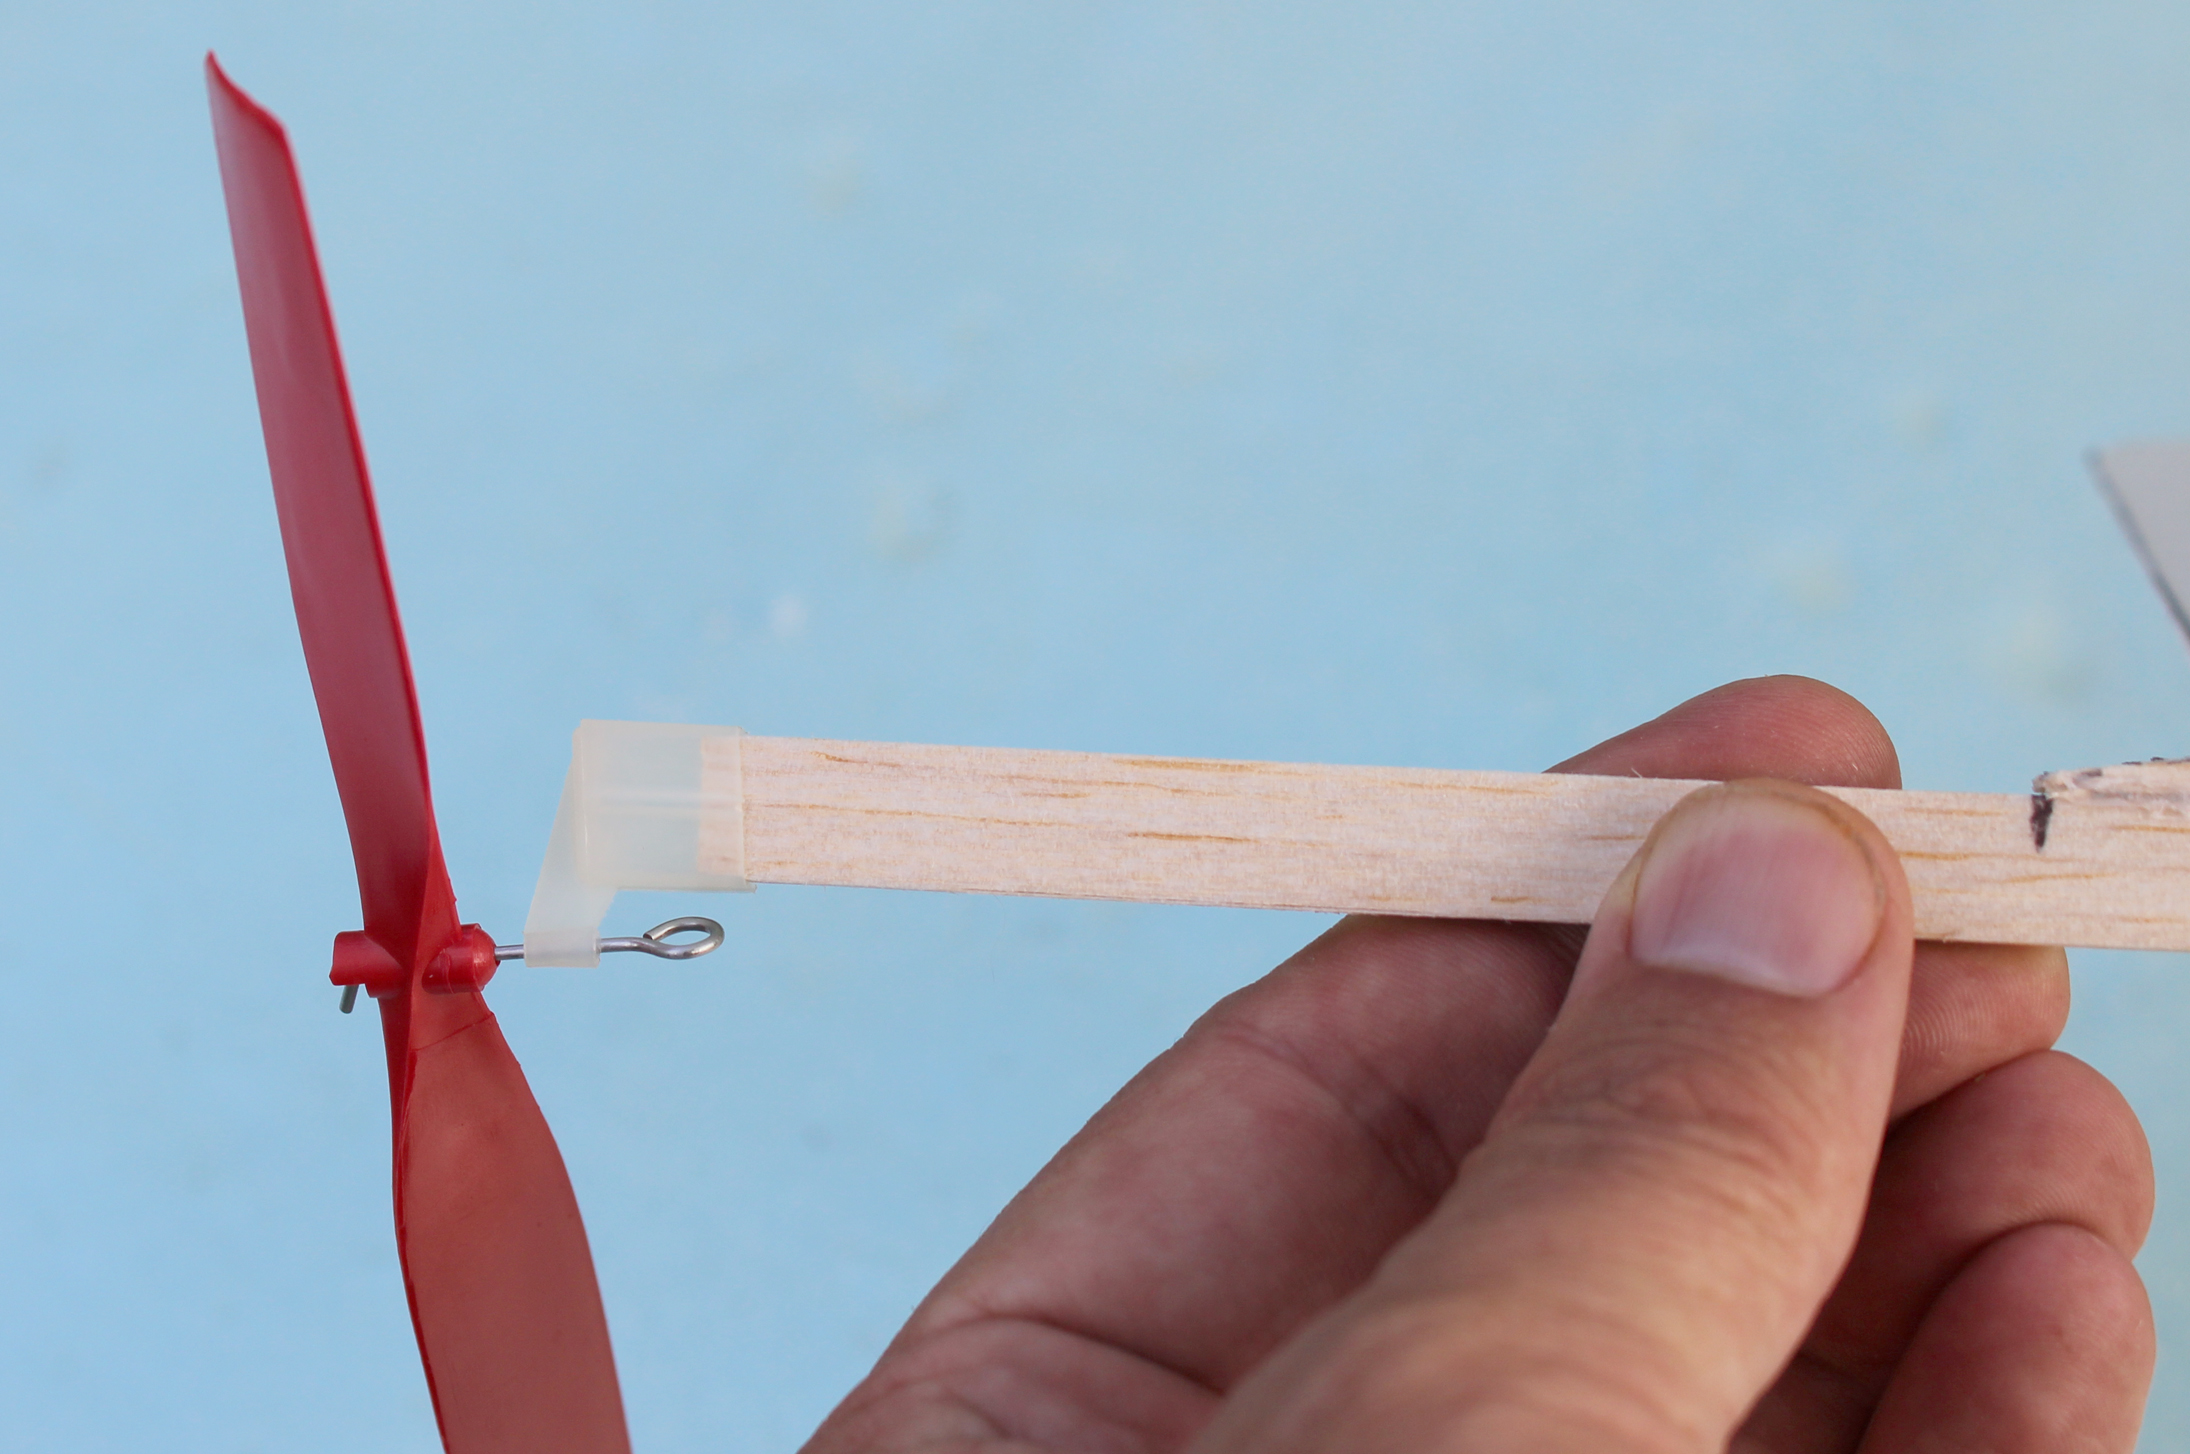
Push the propeller assembly on the front of the fuselage, the propeller shaft must be on the bottom.

Rubber motors can easily be 1 1/2 times the length from the propeller shaft to rear hook but for hand winding I find it works best to make it that length with little extra.
Center of Gravity Balance
I find that this plane flies well when balanced at the spot that the bend in the wing occurs. If the airplane will not climb, try cutting the front end of the fuselage by a small amount and trying again. If the propeller you are using is heavier this might be needed for proper balance.

Cut the rubber strip and tie a knot with the ends.
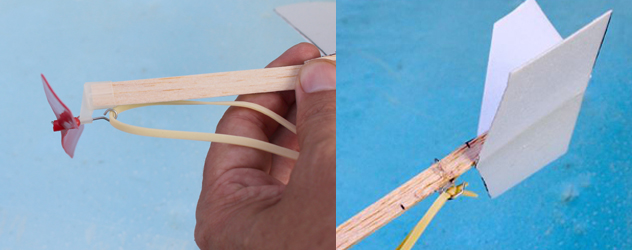
Attach the rubber with the knot in the rear hook.
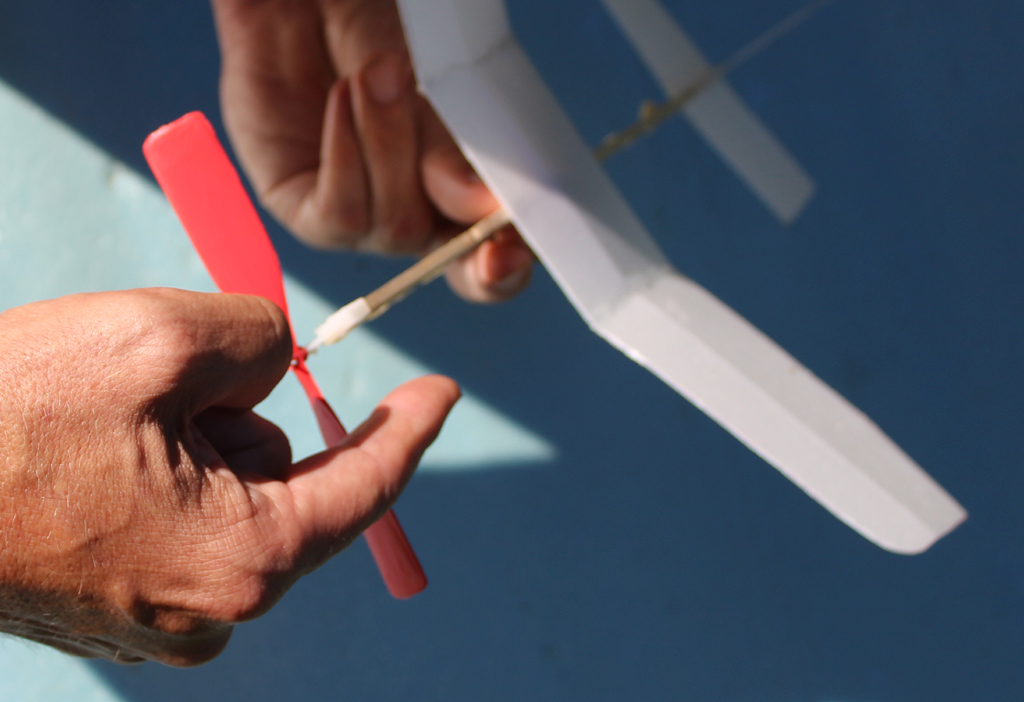
Spin the propeller clockwise to wind with your finger.
Propellers

I purchased a bunch of the Sig 5 1/2″ propellers so have been using those, I am going to try other propellers such as the Midwest 6″ black propellers and the Guillow’s 5 1/2″ propeller that is common to their smaller slip-together all balsa airplanes.
A rubber winder makes winding much easier and a greater number of turns can be wound into the rubber.
For more Information on the basics of trim adjustments and rubber motors check out my other webpages:
Foam Plate and Plastic Straw Gliders
Videos of the Fantastic Foam Flyer
30 Second Video of Construction and Flight
Foam Rubber Powered Flying High
Rubber Powered Foam Plane New Camera
Rubber Powered Foam Plane Flying High at WSU

New 8/20/2015 – Phases of Flight of Fantastic Foam Flyer video
College for Kids 2015

The first testing ground for the Fantastic Foam Flyer was my Engineering Through Models class. Despite repeated crashing into hard surfaces indoors the airplane kept flying with little damage.
Pictures of Fantastic Foam Flyers Sent to Me

Our two Grandsons and I each built one on our camping trip. They fly great. I have since added a 4th panel to the center section, some tip plates, and lengthened the fuse 2″…Also went up an inch on the prop. Haven’t flown it yet. Denny

Paul sent a picture of FFF along with two other foam planes.

This plane was used in The First Foam Plate Rubber Power Postal Contest, best flight 2:20
Video of Fantastic Foam Flyer flying Indoors for Flight Club Rye UK
Nice, Bill: couple thoughts, after I put in the tailhook, I put some glue over the wire and wood, otherwise I’ve had the hook pull out if the wood is soft. Also, suggest they prop the wing tip up on the dihedral block at the edge of the table and sand in a “slant” so the joints are tight and smooth.
All in all, very good, Neil
I do need to include a picture of the rear hook where glue can be seen on it. With the wing having a bend in it, sanding an angle might be tough. So far none of the wing joint have failed.
Looks really good I think a teacher or youth leader could follow these instructions without past exsperence.
I would suggest they do a test build first for two reasons. So they they can make all mistakes in privacy. Then they will have a completed unit for students to mimic.
Great work, Bill! Well worked out design, good explanation for why foam is so good to work with (from readily available plates) and fantastic, detailed instructions. I notice that the wing is quite far back. I have done that too when I’ve had stalling and I wonder if there are any disadvantages (stability?). Why don’t we see that more?
Where did you get the balsa slicer?
I know that simplicity is a big advantage of this design for beginners. Still the control freak in me tenses at the thought of not being able to trim the wing–both placement and angle of attack. But I guess it’s actually less confusing for a beginner to be able to do it just moving a clay weight forward and backward.
Good work!
I wanted to make this really simple and with the adjustable wings I find that it will often shift on landing, if you do not notice and correct it is out of trim. With the long nose if there is not enough climb, cut off the front of the fuselage to change the CG. So far unless using a heavier propeller the CG was fine.
The balsa stripper was purchased at local hobby shop but there is a link to Amazon to purchase it.
quisiera saber donde se puede comprar o adquirir, el sistema de propulsión del aeromodelo (hélice, y soporte para el fuselaje), soy maestro re manualidades, y quisiera realizar esta actividad con mis alumnos, gracias
From translator program “I would like to know where is can buy or acquire, the system of propulsion of the aircraft (propeller, and support to the fuselage), am master re crafts, and would like to perform this activity with my students, thank you.”
This seems to be the best deal on propellers: PITSCO Props
Hello Bill ,
Since the year 2009 I’ve been flying FF models inspired by your ideas . I have flown dozens of foam Jets II , I became a fan of recycling foam plates and trays as well as milk cardbaoard containers . I also built dozens of other FF catapult gliders, among them a foam Vartanian . Now I am building my first Fantastic Foam Flyer , I will try it next sunday on our local park. Thanks for your ideas !!
Ivan
Ian, Thank you so much for your comment! I was pleased how well the Foam Jet II flew but thought it probably was a little too much work. If built from Depron sheet it should be easier without all the splicing. The Fantastic Foam Flyer works really well for most people. I would slowly work up on the number of winds or it could easily fly out of the park.
any disavantage of doing the fuselage stick 15″ instead of 16″ ? that way the left over piece of a 36″ balsa strip is enough to do two wing mounts.
No doubt it could still fly with shorter fuselage, the longer fuselage seems really stable. Wonderful to read you are building this design, it flies well.
Bill