
Introduction
I have built a good number of Guillow kits and have had good success with most of them. There are some modifications I have made for doing stretch winding and have replaced some of the heavier balsa. On some the kits I have left out parts or redesigned the tail surface to be lighter.
In this webpage I hope to give beginners some ideas to try to have a more successful building and flying experience with Guillow’s models.

Selection of Guillow’s Kits at Local Hardware Store
Whether you like the contents of the box a Guillow’s kit comes in, everyone agrees Guillow has some very attractive packaging. No doubt Guillow kits are found on more store shelves than any other model airplane kit and sold by a huge number of online outlets. The company has survived the test of time with beginnings in 1926 founded by Paul K. Guillow.
Note: Check out the article in the April 2016 issue of Model Aviation on the Guillow company by Don DeLoach. This company has been in business for 90 years!
About the Balsa Wood
Although these kits have been known to contain some of the heaviest balsa and were designed with too much balsa in places, the newer kits are coming with lighter balsa and designed with less balsa. New design kits come with laser-cut balsa and many of the older designs have been re-done with laser-cut wood.

Wood in Guillow Edge 540 kit is laser-cut, well marked, and of reasonable weight.
Too Much Wood in Design

In some Guillow kits the fuselage sides were made from balsa sheet instead square sticks, even with the cutout areas the larger amount of balsa resulted in greater weight. If the balsa was a really heavy density the weight was substantial.
Too Much Balsa in the Tail

In this view of the stabilizer of the Cessna 150 it can be seen that there is much larger wood used than in most rubber powered models of this size. As I was converting this airplane for radio control I thought the larger wood size to be fine.
The big problem with a heavier tail structure is often much extra nose weight is needed in the nose of the airplane to counterbalance the heavy tail.
The Rubber Motor
Duration of the Rubber Motor Run
How long the propeller will spin the propeller before completely unwinding is limited to how many turns can be stored in the length of rubber. This will determine how long the power phase of the flight will be. If the airplane can climb and then level off with a limited amount of thrust required, the propeller can turn slower and use up the turns slower. Propellers for rubber powered airplanes will normally be larger than propellers that would be on a similar sized airplane using an electric or gas motor which would spin the propeller faster. To fly the airplane on less thrust, the model airplane needs to be built very light which means less lift needs to be created to counteract the weight. The rubber motor can provide a good amount of energy for it’s weight.
The rubber provided in the Guillow’s kits is not regarded as being the best quality for extended flight. The rubber that you will want to obtain is produced through FAI Model Supply but many other vendors distribute their rubber strip in different sizes and quantities.
Sources For a Better Rubber Motor

F.A.I. Tan Super Sport Rubber
Access to Rubber Motor in Enclosed Fuselage
For models with a full-width fuselage that encloses the rubber motor a method is needed to access the rubber motor for replacement and for stretch winding. As shown on the plans it assumes that you will install the included rubber motor and never change it as there are no openings shown in the front or the rear of the model.
For extended flight times and to be able to fly your model more than a few times, easy access is needed to change the rubber motor and room to push a “blast tube” inside of the fuselage. The blast tube encloses the rubber motor while it is being wound in case the rubber motor breaks which can destroy the fuselage.

ArmorAll and Son of a Gun are Spray Lubricants Found in Automotive Supply
Rubber motors should be inspected frequently for nicks and replaced with a new motor before the current rubber motor breaks. The rubber motor should also be frequently lubricated also between flights.

Common practice is to put rubber motors in sealable plastic bag, spray in lubricant, and rub it into the motors from outside the bag.
Removeable Nose Piece
Access for the rubber motor and blast tube is normally needed from the front of the model. In most cases the entire front of the nose must be removed so there is room for the blast tube to enter the fuselage. This removeable nose must be fastened to the fuselage by some method or it will fall off as the tension of the rubber motor weakens towards the end of the flight.
The best methods I have found to hold the nose are creating enough area of friction behind the nose with the inside of the fuselage or by using tiny neodymium magnets.

Neodymium magnets Super Cub coming in for landing
hold cowl in place.
Friction Fit
If there is enough friction between nose piece and inside of the fuselage the nose should stay on.

For this Guillow’s Lancer I put foam on the insides of fuselage nose area to put pressure and grip to the balsa nose piece.
Result of Improper Fastening of the Nose Piece

Before installing the magnets on the nose of the Guillow Super Cub 95 the nose piece and propeller could be seen dangling by the rubber motor at the end of the flight.
The Winding Stooge

Guillow’s Flyboy seen attached to stooge from Midwest Products that appears to be no longer available.

A mechanical winder is used to put the turns in the rubber strip, this low cost 5 to 1 winder
is only suitable for the smaller rubber models.

When winding with a mechanical winder normally a “stooge” is used to hold the model through the rear hook. An aluminum tube is used for the rear hook and a stiff wire passes through the center of the tube while going through holes in the stooge. In this manner the tension of winding the rubber is not put on the airplane until the wire is pulled out.
Instructions for Building Winding Stooge on Thayer Syme Website
Winding Stooge Kit from RetroRC

A stiff music wire passes through the holes on the two sides of the stooge.

In place of the wood dowel included in the kit, an aluminum tube is used that will slide in and out of holes in the fuselage.

This view shows the wire passing through sides of stooge and through the aluminum tube inside of the airplane.

An opening is needed to gain access at the rear hook of an airplane with a full width fuselage. The opening is normally a rectangle cut out of the tissue on the bottom of the fuselage in the area of the rear hook. To change out the motor the tube is pulled out and the new rubber must loop around the rear hook tube when it is inserted back in the fuselage.
Winding With a Blast Tube


The brass tube used as a blast tube is much heavier than needed, normally blast tubes are plastic. The length of wire with bend on each end is to allow the blast tube to be slipped over the wire and then you grab the rubber and attach to the propeller shaft.
Purchase Blast Tube Volare Products

The Guillow Number Series of Kits
Guillow’s catergorizes their models into number series starting at 200 and increasing sequentially by 100 to 1000 and then jumping up by random gaps. I have built some models in different series but in some series I have not built any of the models. In the 4000 series – Simple Build n’Fly I have built all of the models. In the 600 series – Simple Build-by-Number I have built all the models with the exception of the Javelin.
The following are images and experiences I have had with the Guillow models I have built:
300 Series – Private Planes
DHC-2 Beaver


In this series I first started building the DHC-2 Beaver kit which is one of the newer designed airplanes. The wood didn’t seem real heavy but there was a lot of it in the structure of the airplane. After I started building I decided this might make a good airplane for electric radio control with the equipment from the popular electric Champ.
This was my first conversion of a rubber powered model to electric RC and maybe just by luck it worked out well. The power was adequate but I had to stuff a fair amount of weight in the cowling for proper balance. I have flown this plane many times both outdoors and indoors although it is rather fast for indoors. With a slight dive the airplane will loop.
Cessna 150


As my DHC-2 Beaver construction was progressing I thought ahead at the next rubber
model I would convert to electric RC and purchased the Guillow’s Cessna 150 kit. This was a newer kit that had lightweight wood that was laser-cut. For electric parts I decided to use a more powerful brushless motor and slightly larger servos. Working with the light wood and trying to install radio equipment I broke the airplane several times during construction. For covering I used Microlite plastic covering for the first time which was a real challenge. On the fuselage the covering pulled in too tight with the heat shrinking and bent the stringers.
The first flight of the Cessna it was apparent the airplane had plenty of power, but it never controlled very well. On the second flight even flying at half throttle I ripped one wing off. In repairing and strengthening the wing joint I ended up with less dihedral and worse control. Adding more dihedral back in the airplane still didn’t control very well. If I had used the lighter equipment and less power as in the Beaver it might have flown well, no doubt it can fly well as a rubber powered free flight.
PC-6 Porter


I have the construction of the PC-6 Porter kit almost done. This is one of the newer laser-cut kits that has lighter wood. My criteria for selecting this kit was that Don DeLoach had written a review of this airplane for Model Aviation magazine October 2013 that was rather positive. Looking at the design of the airplane it has a rather long nose which should make for easier balance without nose weight. The wingspan is 26 inches so it is a fairly large airplane.
Update 5-26-2015 – PC 6 Porter Flies

Although there are no decals or trim on the airplane, I flew the PC-6 Porter over tall grass and was really impressed how well it flies. The flight path is a circle to the left under power, I might change trim to right but the balance appears to be near perfect without having to add any weight. Weight without rubber is 39 grams, so far only a single loop of 3/16″ has been tried, two loops of 1/4″ should give a steeper climb. It was rather dark when flying, I will try to get better pictures and video.
Video of PC-6 Porter Trim Flight
Update 6/2/2015 – Two Loops of 1/8″ Rubber


With two loops of 1/8″ rubber the climb is steeper but now it tends to stall on the first part of the flight during the power burst, additional trim adjustments needed.
Update 6/5/2015
The cowl was shimmed slightly to the right so the airplane flies to the right which appear to have eliminated the stall.
Video of Porter Flying to the Right
600 Series – Simple Build-by-Number
Cessna 180


The first Guillow kit I built was the Cessna 180 back when I was in elementary school, for whatever reason I gave up on the fuselage and used a balsa stick to attach all the flying surfaces to. I have a memory of flying the airplane in front of my parents house.
A couple of years ago I decided to build another Cessna 180 including the fuselage. Construction went well although I had a hard time covering the top of the wing without wrinkles because I tried to cover each half with a single sheet of tissue. I tried flying with the stock 6” Guillow’s propeller and later installed a larger Peck propeller. Flights were always on the edge of a stall as the airplane was just too heavy.
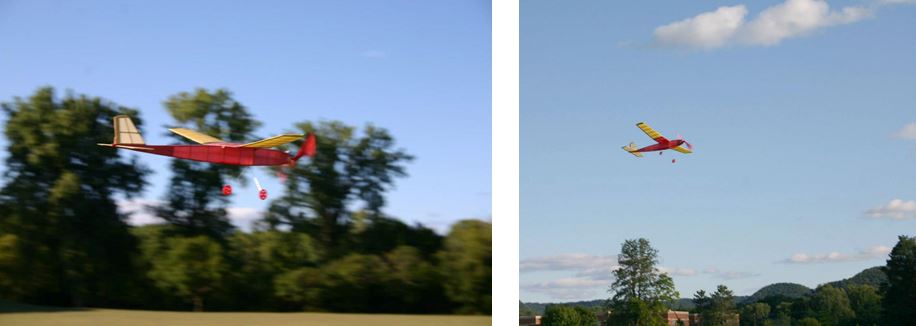
Super Cub 95

Constructing the Super Cub 95 is almost identical to the Cessna 180, but I decided in building the Super Cub I would build it much lighter. The biggest weight savings was by building the tail surfaces from 1/16” square balsa with the outside curved pieces formed wet around a form.
I also substituted some of the strip wood in the kit with lighter balsa. Again flying started with the stock Guillow’s propeller which I replaced with a larger Peck propeller. What a difference building lighter made, this plane flew so much better and for a much longer duration.
Close Video of My Super Cub 95 Flying
Lancer
New Video of Guillow’s Lancer Flying

The Javelin and Lancer designs are very similar with the difference being the Lancer has a cabin area with a windshield in the fuselage. In the Lancer kit I built the wood was pretty light and I built just like the plans except for making a removeable nose that had a tight friction fit with foam inside of the fuselage. For the landing gear I made it removeable by holding it on by a rubber band. For a propeller I used the larger black propeller that came in DHC-2 Beaver kit, covering was Esaki tissue.


My first flights were with the landing gear attached but I soon determined the airplane flew better without the landing gear. For power I had single loop of 3/16” rubber to start with but changed to 1/8” rubber in two loops for a faster climb. My Lancer always flew well but never glided very well. Other people have mentioned that with Lancer and Javelin, many people think it is because the airfoil is too thick. Sometime I would like to build a thinner wing for my Lancer but for flying from smaller fields the shorter glide is a good thing.
Adding Fuse DT to Lancer

I wanted to experiment with using the traditional fuse DT so modified my Lancer for DT the front of the wing pops up on DT bringing it quickly down.
Blog article: I Have a Short Fuse – on my Guillow’s Lancer

700 – Built light, great flying Kits
Edge 540

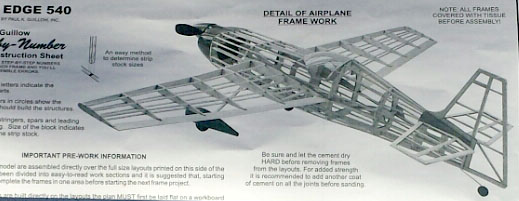
I have not yet built any of the airplanes in this series but I do have the Edge 540 kit which looks good. The wood appears to be light and the design is such that there is less wood than many of the other airplanes. From what I have read the Fairchild 24 and the Arrow are great flyers.
900 Series – Easy to Build Scale Flying
P-51D Mustang


I had done the major amount of construction on a P-51D Mustang a couple of years ago and then moved on to other projects, I plan to work on it again. Not laser-cut but the balsa appeared to be rather light.

This is a completed Guillow’s P-51D by Keith Widmann.
4000 – Simple Build n’ Fly Series
I started with the most difficult model in this series first, the Flyboy. In that I have been building model airplanes for a long time it wasn’t a problem but if you are a beginner I suggest starting with an easier model.
Flyboy
The Flyboy took the longest to build just because of the larger number of pieces in the kit. The structure is the more conventional type of many small square strips glued together to make up the fuselage. I did add tiny dowels to hold the wing on instead of using a large rubber band over the fuselage as shown on the plans. I might have saved a little weight by drilling 4 holes in each plastic wheel. Covering was lighter also and not what was provided in the kit. No doubt a bigger propeller might have improved performance further. I never took any pictures during construction but have a good number of pictures of it flying.
Video of My Flyboy and Cloud Buster Flying
Cloud Buster

I have built two Cloud Busters with the hope that I could improve performance on the second Cloud Buster by building it lighter and using a larger propeller assembly. To try to save weight on the second model I cut holes in the wing ribs, looking back I saved very little weight and I really could not tell that the lighter plane flew any better. If I were to build another one I would only cover one side of the tail surfaces.


On the first Cloud Buster I had installed heavier landing gear to give the airplane more nose weight. It would be better to move the wing pylon further back to achieve proper balance.

Construction pictures of the first Cloud Buster I built. The last wing rib at the tip is very fragile because of the cutout for the spar and because it is so thin.
Cadet

I no longer have my Cadet model, one suggestion is to modify the propeller hub to something that supports the propeller shaft better.
Goldwing Glider

Hand launch gliders would seem simple as there are few parts of a heavy wood so the airplane is not easily broken during construction. The tougher part is adjusting and launching the glider. A glider goes through a high-speed launch phase and then must transition into a slow glide. If it is not thrown just right and adjusted correctly it can dive straight into the ground after launch. Some people complain the balsa fuselage breaks to easily. After hand launching my Goldwing I put a hook on the fuselage to convert it to a catapult glider, this worked well for me.
Additional Resources
Books
Videos
https://youtu.be/KF3xbyI3tPg Mark Batterson Arrow
https://youtu.be/Toh845PYRhw Cessna 150
https://youtu.be/6A4PKzVxga8 Javelin
https://youtu.be/LymFNcBrcHM Douglas Skyraider
https://youtu.be/hYYo_7WMd_E Beaver on Floats
https://youtu.be/TnImIsE_Gyc Chipmunk
Websites
http://www.guillow.com Guillow’s Company Website
Guillow’s Model Builder’s Forum – a great resource to interact with other builders of Guillow’s model aircraft.
All Balsa Airplanes and Gliders

Guillow’s Display at Everything Hobby Rochester
Guillow’s sells a huge number of all balsa airplanes that can be slipped together without glue. Trouble is without glue the parts often shift which causes more flight problems. Often the stability of these airplanes is lacking and slight modifications can correct this. The rubber motor included is not designed for a large number of winds.

Strato Streek
Several years ago I created a webpage on modifying the Strato Streek rubber powered slip together airplane, I basically replaced the rubber motor and added more dihedral and the plane flew well. Other people have created tutorials about modifying these airplanes that are much better than what I had done so I am providing the links to those resources.

Improving Your Guillows Sky Streek by Gary this is a very detailed web tutorial. There is a video at the end of this airplane flying well over one minute.

From AMA Flight School Video Tutorial – How do I Modify Stock Rubber Powered Model
with Dave Gee (Stuka Dave)

Catapult Glider Upgrade Video by Dave Gee

Thank you for the informative and up-to-date article. I appreciated many of your building and flying tips. Have you ever built any of the Easy-Built company planes? I just discovered them after 3 decades away from the free-flight rubber plane hobby. My Dad, brother and I bought and built planes from SIG in the late 60’s and early 70’s and have built a number of the older Guillows kits. I am in the process of building an Easy-Built kit “Rainbow”. It’s a 36″ wingspan model originally designed prior to 1942. Although it is termed as “Easy” to build, I have found it more difficult than I remember from when I was young. Easy-Built doesn’t really have detailed building steps in their models. You kind of just jump in and start building. Again, appreciate your article and I look forward to new tips and more articles.
Mark, Thank you so much for your comments. I have built the Easy-Built IMP and Aeronca Chief. Very lightweight wood but as you mentioned the plans and instructions not as detailed as in Guillow kits.
I do plan to expand on this, the views have been pretty good but I was hoping for more.
Bill Kuhl
Suggest the modeler photo archive be accessed on model name to see the results of other modeler’s work.
The Indiana Science Olympiad has a flying event called the “Indiana Aerial Scramble”. the rules stipulate that your team starts with two unopened Guillows Skystreak kits to start. Model can have a wingspan that is 36 cm (the stock kit is 30.5 cm). Model can weigh between 8 and 14 grams. Rubber can be changed. The event is flown indoors for high-time aloft. 2 gram max on the rubber motor
Current highest-times range around 40-55 seconds indoors.
Modifications to succeed:
1. Dihedral wingtips- use the short width of a credit card to draw a line for this.
2. Modify the nose so that when the prop bearing is slid into place, the downthrust in neutralized.
3. Remove the aft fuselage section from under the stabilizer slot. Re-position and glue to the top with enough length to glue on the stab. Glue to bottom of this section.
4. glue fin on top.
5. Sand all the parts especially the trailing 1/3 of all surfaces so that trim adjustments can be made bu compressing the wood to bend.
6. Change the motor to 3/32 FAI Tan. Because the loop is so long, braid the motor for best results.
If you like the cloud buster, you should build a Hangar Rat.
http://www.ctie.monash.edu.au/hargrave/images/hangar_rat_starick_A4@30dpi.jpg
I hope the link works. I have built two of these. Lost my first one, it flew away (too close to a wooded area and its an indoor modle). It should have about wingspan. I am getting flights of about 90 seconds from 1/8th rubber loop 18″ long
Thanks for the tips. Built many of these as a kid and getting back into building / flying.
Dear Sir, can you tell me about the PBY kit/ Is it die crunched and ,if so, how good is the die crunching? Lert me know and thanks
Bill Swain
Bill, I have not seen the kit, it is NOT laser-cut. Looking through Amazon reviews, I did find plenty of negative comments on the wood and the instructions. Some people thought instructions were fine.
From someone that built PBY: “Built it many years ago when it first came out. It is a real builders kit with many parts. Seems like the rear horizontal stab had over 75 parts in it alone. Really is a great kit.”
Hi Bill
If I were to make models like Prairie Bird, FA Moth etc, what size alum tubing should be used for rear motor peg? Will 1/16″ OD tubing from KS Metals be sufficient?
Alternatively, will toothpicks and the ear cleaning buds (the ones which have thin wooden dowel instead of the plastic tube) also work?
The thing with the rear peg is a wire goes through the tubing to attach it to the winding stooge. Think I am using 3/32″ because 1/16″ music wire can go through. If you are not using a stooge, then maybe your other options would work. With a larger rubber motor it might bend or break. Maybe someone else will have a better response. Bill